Program Name: Avid Media Composer 2024.6
Program Type: Vdeo Editing
Release Date: June 27, 2024
Homepage: www.avid.com/US/products/media-composer/
Interface Language: Multilingual
Platform: Win & Mac
Where are the documents for Media Composer v2024?
Media Composer v2024.6 What's New
Media Composer v2024.6 ReadMe
Media Composer v2024.2 What's New
Media Composer v2024.2 ReadMe (updated April 30, 2024)
Media Composer Install Guide
Media Composer v2024.x Editing Guide
Media Composer v2024.x Effects and Color Correction Guide
What’s New for
New in Media Composer v2024.6
The following are new for Media Composer v2024.6:
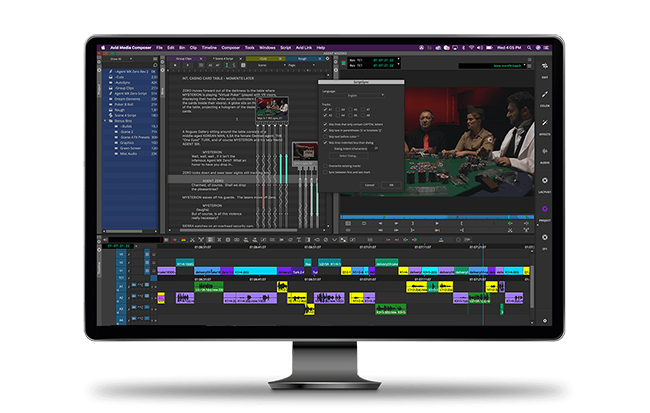
Transcript Tool
Subclips and Groups Reference the Transcript for Master Clips
Manage Transcription of Clips per Bin
Import Pro Tools Session (PTXM) into Media Composer
Expanded Marker Colors and Fields
Sub-Frame Automation for Volume and Pan Controls
Update to the Public Preview of OpenTimelineIO (OTIO)
Transcript Tool
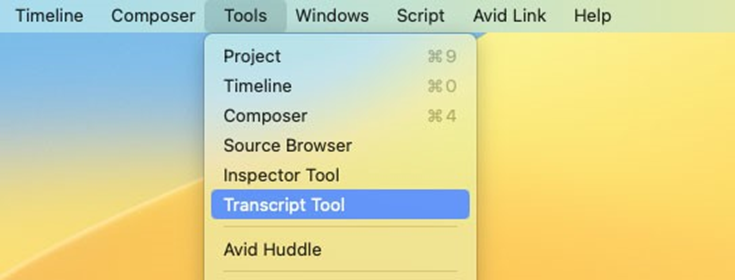
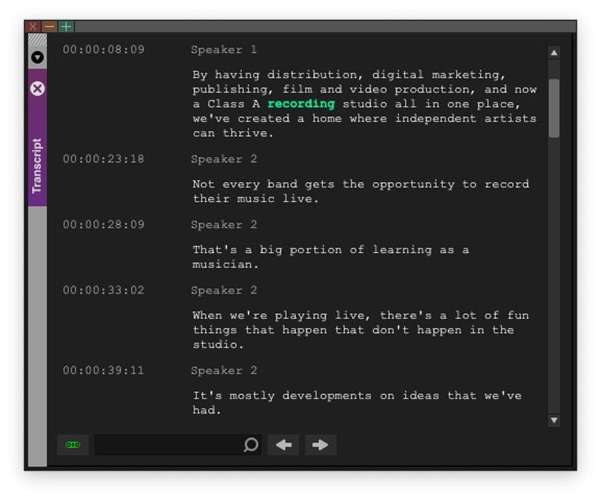
The Transcript Tool in Media Composer is a dockable window that provides direct access to transcripts for each clip. You can open the Transcript Tool by choosing Tools > Transcript Tool. Once opened, the Transcript Tool will update each time a clip is loaded into the Source monitor, providing real-time display of transcriptions, which includes timecode and Speaker ID.
Only one instance of the Transcript Tool is currently possible.
By default, the Transcript Tool is ganged to the Source monitor’s playhead, which displays as a bold, green word to indicate its position in the text, even during playback. Clicking on a word in a transcript will also move the playhead to the related timecode within the clip, and selecting text in the Transcript Tool will set an In and Out mark in the Source monitor. With an In and Out mark set, users can use keyboard shortcuts to Insert (V) or Overwrite (B) into a sequence opened in the Record monitor. The gang button, in the bottom-left corner of the panel, allows users to toggle the relationship between the Transcript Tool and Source monitor. When unganged, the playhead and marks will not update in tandem.

The Transcript Tool also includes the ability to search transcripts. In the bottom-left corner of the panel is a search field, which can be used to find all instances of a word or phrase in the transcription. Clicking the arrows next to the search results, or using the corresponding keyboard shortcuts, will take you to the next or previous instance of the word or phrase.
Changing the Transcript Referenced by a Subclip and Group
The following steps demonstrate how to change the method subclips and groups use to reference transcripts in the transcription database
To have subclips and groups reference master clips in the transcription database:
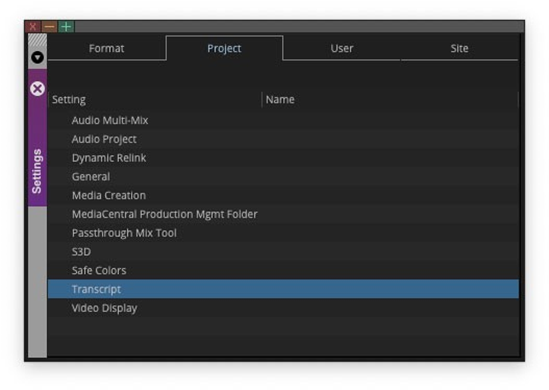
Choose File > Settings > Project > Transcript.

In the Transcript Settings window, click the dropdown menu next to Subclips/Groups and choose “Use Master Clips Transcripts”.
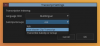
The “Ask” behavior is the default option.
To have subclips and groups transcribed independently, instead of referencing the master clip:
Choose File > Settings > Project > Transcript.
In the Transcript Settings window, click the dropdown menu next to Subclips/Groups and choose “Transcribe Subclip or Group”.
With this option selected, subclips and groups will always be transcribed independently.
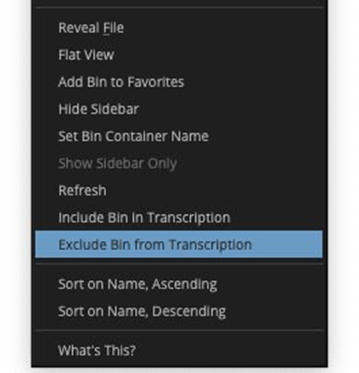
Manage Transcription of Clips per Bin
By default, Media Composer will create a transcription for all media in a project. However, some media, such as music, sound effects, or even some camera media without synced audio, may not require a transcription. The ability to not transcribe a bin means fewer computer resources are used, which can be important when working on large projects with a less capable machine.

It is now possible to select the bins that will be transcribed by right-clicking on a bin and choosing “Include Bin in Transcription” or “Exclude Bin from Transcription”. Text is displayed to the right of a bin, in the Bin Container sidebar, to indicate if it is set to “Transcription On” or “Transcription Off”.
In addition, there is a new option in the Transcript Settings window to “Include all new bins in transcription”. If this settings is unchecked, all new bins will be excluded from transcription.
Import Pro Tools Session (PTXM) into Media Composer
Users are now able to work faster and more efficiently by preparing a session file in Pro Tools that can be imported into Media Composer. This is part of an ongoing effort to bring the two applications closer together through a more flexible interchange of files and metadata. In Pro Tools, files can be saved as “Session (Media Composer Compatible)”, which includes a new “.ptxm” extension that can be imported into Media Composer.
A PTXM file can be imported or linked. This can be done from the Source Browser or by dragging the file into a bin to import it, or dragging + Option (macOS) / dragging + Alt (Windows) into a bin to link it. The difference between importing and linking a PTXM is how the media is handled. Importing a PTXM will follow the Media Creation settings for import to the destination-managed media. Linking a PTXM will keep media in the current location. Once a PTXM file is brought into a Media Composer bin, a sequence is created with the Session deliverables.
The following items are NOT included in a PTXM file when it is exported from Pro Tools:
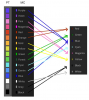
Marker colors in Media Composer have been expanded to sixteen, which include additional options for Purple, Violet, Pink, Denim, Forest, Orange, Gold, and Grey. Also, information that was included in the “Marker Name” field has been split into “Marker Name” and “User”.

In terms of backward compatibility for markers, it is best to output an XML. When viewing markers in a previous version of Media Composer, the expanded color options are mapped to the original eight colors, and the User field returns to the Marker Name field. If markers are exported as a TXT file and imported into a previous version, all expanded colors will default to a single color and the Marker Name field will be ignored.
Sub-Frame Automation for Volume and Pan Controls
Reading and writing with sub-frame automation for Volume and Pan controls is now available in
Media Composer. Sub-frame automation increases precision when working with audio files in Media Composer and provides greater compatibility with Pro Tools as well. Removing words, editing music, and hiding audio edits with sub-frame accuracy provides the best possible results.
Sub-frame automation works similarly to frame-based automation by first clicking on the Volume/ Pan button in the Track Control panel and enabling automation for Volume or Pan. To add a subframe automation point, hover over the clip and hold down the Shift + Command + Option (macOS) or Shift + Control + Alt (Windows) keyboard command, which reveals a small hand icon with a “+” symbol, and click on the automation line segment between frame boundaries. Moving automation points to a sub-frame location can be done by holding Command + Option (macOS) or Control + Alt (Windows) and dragging an automation point. If a user holds the original modifier keys, Option (macOS) or Alt (Windows), the first automation point will be snapped to a frame boundary.
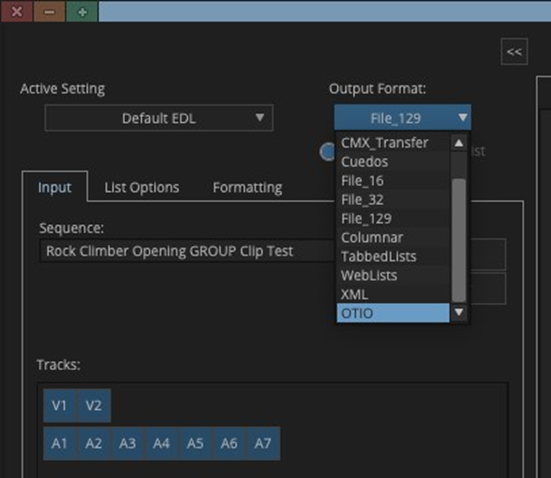
Update to the Public Preview of OpenTimelineIO (OTIO)
As part of an ongoing effort, Avid is participating with the open source community to support OpenTimelineIO (OTIO) functionality for its users. Similar to an Edit Decision List (EDL), OTIO is a human-readable interchange format, which represents the length of master clips and their placement in a sequence. Although, unlike an EDL, an OTIO file may include multiple tracks of video and audio. This format is primarily intended for VFX and online workflows, which require an extensible and easily translatable system for quick turnovers. When exporting an OTIO file from Media Composer, only the most basic effects, such as dissolve, will be included.
Exporting OpenTimelineIO Files(OTIO)
Media Composer is now able to export OpenTimelineIO (OTIO) files using the List Tool.
To export OTIO files (macOS and Windows):

3.Click the “Save List” button, choose a location to save the .otio file, and click Save.
Windows Media Composer 2024.6 Download:
Mac Media Composer 2024.6 Download:
Program Type: Vdeo Editing
Release Date: June 27, 2024
Homepage: www.avid.com/US/products/media-composer/
Interface Language: Multilingual
Platform: Win & Mac
Where are the documents for Media Composer v2024?
Media Composer v2024.6 What's New
Media Composer v2024.6 ReadMe
Media Composer v2024.2 What's New
Media Composer v2024.2 ReadMe (updated April 30, 2024)
Media Composer Install Guide
Media Composer v2024.x Editing Guide
Media Composer v2024.x Effects and Color Correction Guide
What’s New for
New in Media Composer v2024.6
The following are new for Media Composer v2024.6:
Transcript Tool
Subclips and Groups Reference the Transcript for Master Clips
Manage Transcription of Clips per Bin
Import Pro Tools Session (PTXM) into Media Composer
Expanded Marker Colors and Fields
Sub-Frame Automation for Volume and Pan Controls
Update to the Public Preview of OpenTimelineIO (OTIO)
Transcript Tool
The Transcript Tool in Media Composer is a dockable window that provides direct access to transcripts for each clip. You can open the Transcript Tool by choosing Tools > Transcript Tool. Once opened, the Transcript Tool will update each time a clip is loaded into the Source monitor, providing real-time display of transcriptions, which includes timecode and Speaker ID.
Only one instance of the Transcript Tool is currently possible.
By default, the Transcript Tool is ganged to the Source monitor’s playhead, which displays as a bold, green word to indicate its position in the text, even during playback. Clicking on a word in a transcript will also move the playhead to the related timecode within the clip, and selecting text in the Transcript Tool will set an In and Out mark in the Source monitor. With an In and Out mark set, users can use keyboard shortcuts to Insert (V) or Overwrite (B) into a sequence opened in the Record monitor. The gang button, in the bottom-left corner of the panel, allows users to toggle the relationship between the Transcript Tool and Source monitor. When unganged, the playhead and marks will not update in tandem.
The Transcript Tool also includes the ability to search transcripts. In the bottom-left corner of the panel is a search field, which can be used to find all instances of a word or phrase in the transcription. Clicking the arrows next to the search results, or using the corresponding keyboard shortcuts, will take you to the next or previous instance of the word or phrase.
Changing the Transcript Referenced by a Subclip and Group
The following steps demonstrate how to change the method subclips and groups use to reference transcripts in the transcription database
To have subclips and groups reference master clips in the transcription database:
Choose File > Settings > Project > Transcript.
In the Transcript Settings window, click the dropdown menu next to Subclips/Groups and choose “Use Master Clips Transcripts”.

The “Ask” behavior is the default option.
To have subclips and groups transcribed independently, instead of referencing the master clip:
Choose File > Settings > Project > Transcript.
In the Transcript Settings window, click the dropdown menu next to Subclips/Groups and choose “Transcribe Subclip or Group”.
With this option selected, subclips and groups will always be transcribed independently.
Manage Transcription of Clips per Bin
By default, Media Composer will create a transcription for all media in a project. However, some media, such as music, sound effects, or even some camera media without synced audio, may not require a transcription. The ability to not transcribe a bin means fewer computer resources are used, which can be important when working on large projects with a less capable machine.
It is now possible to select the bins that will be transcribed by right-clicking on a bin and choosing “Include Bin in Transcription” or “Exclude Bin from Transcription”. Text is displayed to the right of a bin, in the Bin Container sidebar, to indicate if it is set to “Transcription On” or “Transcription Off”.

In addition, there is a new option in the Transcript Settings window to “Include all new bins in transcription”. If this settings is unchecked, all new bins will be excluded from transcription.
Import Pro Tools Session (PTXM) into Media Composer
Users are now able to work faster and more efficiently by preparing a session file in Pro Tools that can be imported into Media Composer. This is part of an ongoing effort to bring the two applications closer together through a more flexible interchange of files and metadata. In Pro Tools, files can be saved as “Session (Media Composer Compatible)”, which includes a new “.ptxm” extension that can be imported into Media Composer.
A PTXM file can be imported or linked. This can be done from the Source Browser or by dragging the file into a bin to import it, or dragging + Option (macOS) / dragging + Alt (Windows) into a bin to link it. The difference between importing and linking a PTXM is how the media is handled. Importing a PTXM will follow the Media Creation settings for import to the destination-managed media. Linking a PTXM will keep media in the current location. Once a PTXM file is brought into a Media Composer bin, a sequence is created with the Session deliverables.
The following items are NOT included in a PTXM file when it is exported from Pro Tools:
- Video tracks
- Basic folders
- MIDI tracks (unless recorded through an instrument on another track)
- VCA tracks (although their automation data is coalesced)
- Master faders (although they will affect any related bus when rendered)
- Markers (unless they are directly a part of the render)
Marker colors in Media Composer have been expanded to sixteen, which include additional options for Purple, Violet, Pink, Denim, Forest, Orange, Gold, and Grey. Also, information that was included in the “Marker Name” field has been split into “Marker Name” and “User”.

In terms of backward compatibility for markers, it is best to output an XML. When viewing markers in a previous version of Media Composer, the expanded color options are mapped to the original eight colors, and the User field returns to the Marker Name field. If markers are exported as a TXT file and imported into a previous version, all expanded colors will default to a single color and the Marker Name field will be ignored.

Sub-Frame Automation for Volume and Pan Controls
Reading and writing with sub-frame automation for Volume and Pan controls is now available in
Media Composer. Sub-frame automation increases precision when working with audio files in Media Composer and provides greater compatibility with Pro Tools as well. Removing words, editing music, and hiding audio edits with sub-frame accuracy provides the best possible results.
Sub-frame automation works similarly to frame-based automation by first clicking on the Volume/ Pan button in the Track Control panel and enabling automation for Volume or Pan. To add a subframe automation point, hover over the clip and hold down the Shift + Command + Option (macOS) or Shift + Control + Alt (Windows) keyboard command, which reveals a small hand icon with a “+” symbol, and click on the automation line segment between frame boundaries. Moving automation points to a sub-frame location can be done by holding Command + Option (macOS) or Control + Alt (Windows) and dragging an automation point. If a user holds the original modifier keys, Option (macOS) or Alt (Windows), the first automation point will be snapped to a frame boundary.
Update to the Public Preview of OpenTimelineIO (OTIO)
As part of an ongoing effort, Avid is participating with the open source community to support OpenTimelineIO (OTIO) functionality for its users. Similar to an Edit Decision List (EDL), OTIO is a human-readable interchange format, which represents the length of master clips and their placement in a sequence. Although, unlike an EDL, an OTIO file may include multiple tracks of video and audio. This format is primarily intended for VFX and online workflows, which require an extensible and easily translatable system for quick turnovers. When exporting an OTIO file from Media Composer, only the most basic effects, such as dissolve, will be included.
Exporting OpenTimelineIO Files(OTIO)
Media Composer is now able to export OpenTimelineIO (OTIO) files using the List Tool.
To export OTIO files (macOS and Windows):
- Select a sequence and choose Tools > List Tool.
- In the List Tool Window, click on the dropdown menu for Output format and choose “OTIO”.
3.Click the “Save List” button, choose a location to save the .otio file, and click Save.
Windows Media Composer 2024.6 Download:
Для просмотра содержимого вам необходимо авторизоваться.
Mac Media Composer 2024.6 Download:
Для просмотра содержимого вам необходимо авторизоваться.