How to easily visualise MediaPipe’s human pose tracking with Rerun

Human Pose Tracking | Image by Author
Overview
We explore a use case that leverages the power of MediaPipe for tracking human poses in both 2D and 3D. What makes this exploration even more fascinating is the visualisation aspect powered by the open-source visualisation tool Rerun, which provides a holistic view of human poses in action.
In this blog post, you’ll be guided to use MediaPipe to track human poses in 2D and 3D, and explore the visualisation capabilities of Rerun.
Human Pose Tracking
Human pose tracking is a task in computer vision that focuses on identifying key body locations, analysing posture, and categorising movements. At the heart of this technology is a pre-trained machine-learning model to assess the visual input and recognise landmarks on the body in both image coordinates and 3D world coordinates. The use cases and applications of this technology include but are not limited to Human-Computer Interaction, Sports Analysis, Gaming, Virtual Reality, Augmented Reality, Health, etc.
It would be good to have a perfect model, but unfortunately, the current models are still imperfect. Although datasets could have a variety of body types, the human body differs among individuals. The uniqueness of each individual’s body poses a challenge, particularly for those with non-standard arm and leg dimensions, which may result in lower accuracy when using this technology. When considering the integration of this technology into systems, it is crucial to acknowledge the possibility of inaccuracies. Hopefully, ongoing efforts within the scientific community will pave the way for the development of more robust models.
Beyond lack of accuracy, ethical and legal considerations emerge from utilising this technology. For instance, capturing human body poses in public spaces could potentially invade privacy rights if individuals have not given their consent. It’s crucial to take into account any ethical and legal concerns before implementing this technology in real-world scenarios.
Prerequisites & Setup
Begin by installing the required libraries:
# Install the required Python packages
pip install mediapipe
pip install numpy
pip install opencv-python<4.6
pip install requests>=2.31,<3
pip install rerun-sdk
# or just use the requirements file
pip install -r examples/python/human_pose_tracking/requirements.txt
Track Human Pose using MediaPipe

Image via Pose Landmark Detection Guide by Google [1]
MediaPipe Python is a handy tool for developers looking to integrate on-device ML solutions for computer vision and machine learning.
In the code below, MediaPipe pose landmark detection was utilised for detecting landmarks of human bodies in an image. This model can detect body pose landmarks as both image coordinates and 3D world coordinates. Once you have successfully run the ML model, you can use the image coordinates and the 3D world coordinates to visualise the output.
import mediapipe as mp
import numpy as np
from typing import Any
import numpy.typing as npt
import cv2
"""
Read 2D landmark positions from Mediapipe Pose results.
Args:
results (Any): Mediapipe Pose results.
image_width (int): Width of the input image.
image_height (int): Height of the input image.
Returns:
np.array | None: Array of 2D landmark positions or None if no landmarks are detected.
"""
def read_landmark_positions_2d(
results: Any,
image_width: int,
image_height: int,
) -> npt.NDArray[np.float32] | None:
if results.pose_landmarks is None:
return None
else:
# Extract normalized landmark positions and scale them to image dimensions
normalized_landmarks = [results.pose_landmarks.landmark[lm] for lm in mp.solutions.pose.PoseLandmark]
return np.array([(image_width * lm.x, image_height * lm.y) for lm in normalized_landmarks])
"""
Read 3D landmark positions from Mediapipe Pose results.
Args:
results (Any): Mediapipe Pose results.
Returns:
np.array | None: Array of 3D landmark positions or None if no landmarks are detected.
"""
def read_landmark_positions_3d(
results: Any,
) -> npt.NDArray[np.float32] | None:
if results.pose_landmarks is None:
return None
else:
# Extract 3D landmark positions
landmarks = [results.pose_world_landmarks.landmark[lm] for lm in mp.solutions.pose.PoseLandmark]
return np.array([(lm.x, lm.y, lm.z) for lm in landmarks])
"""
Track and analyze pose from an input image.
Args:
image_path (str): Path to the input image.
"""
def track_pose(image_path: str) -> None:
# Read the image, convert color to RGB
image = cv2.imread(image_path)
image = cv2.cvtColor(image, cv2.COLOR_BGR2RGB)
# Create a Pose model instance
pose_detector = mp.solutions.pose.Pose(static_image_mode=True)
# Process the image to obtain pose landmarks
results = pose_detector.process(image)
h, w, _ = image.shape
# Read 2D and 3D landmark positions
landmark_positions_2d = read_landmark_positions_2d(results, w, h)
landmark_positions_3d = read_landmark_positions_3d(results)
Visualise the output of MediaPipe using Rerun

Rerun Viewer | Image via Rerun Docs [2]
Rerun serves as a visualisation tool for multi-modal data. Through the Rerun Viewer, you can build layouts, customise visualisations and interact with your data. The rest part of this section details how you can log and present data using the Rerun SDK to visualise it within the Rerun Viewer
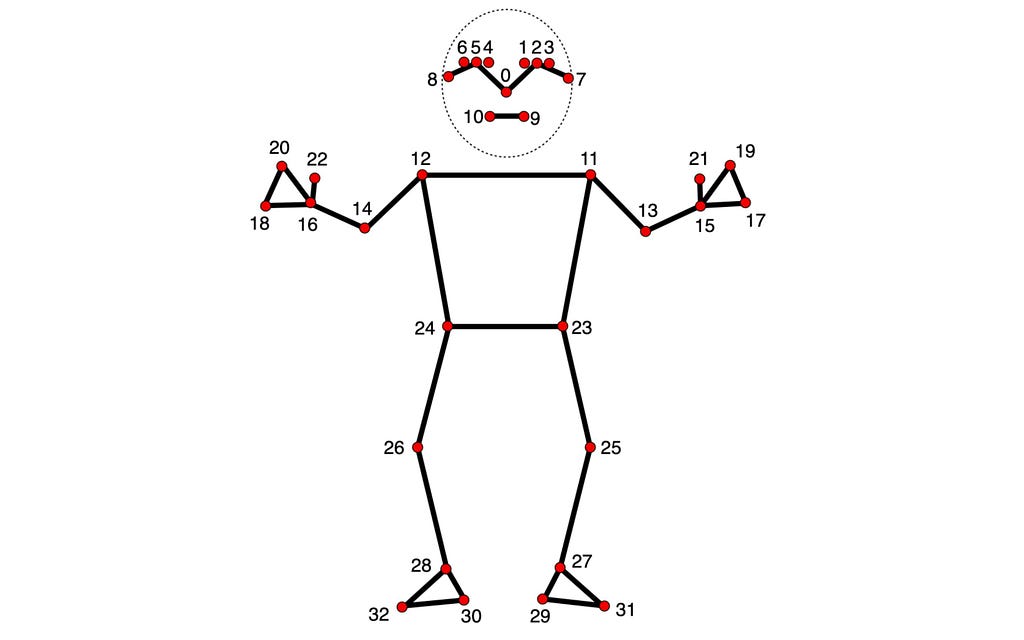
Pose Landmarker Model | Image via Pose Landmark Detection Guide by Google [1]
In both 2D and 3D points, specifying connections between points is essential. Defining these connections automatically renders lines between them. Using the information provided by MediaPipe, you can get the pose points connections from the POSE_CONNECTIONS set and then set them as keypoint connections using Annotation Context.
rr.log(
"/",
rr.AnnotationContext(
rr.ClassDescription(
info=rr.AnnotationInfo(id=0, label="Person"),
keypoint_annotations=[rr.AnnotationInfo(id=lm.value, label=lm.name) for lm in mp_pose.PoseLandmark],
keypoint_connections=mp_pose.POSE_CONNECTIONS,
)
),
timeless=True,
)
Image Coordinates — 2D Positions

Visualising Human Pose as 2D Points | Image by Author
Visualising the body pose landmarks on the video appears to be a good choice. To achieve that, you need to follow the rerun documentation for Entities and Components. The Entity Path Hierarchy page describes how to log multiple Components on the same Entity. For example, you can create the ‘video’ entity and include the components ‘video/rgb’ for the video and ‘video/pose’ for the body pose. If you’re aiming to use that for a video, you need the concept of Timelines. Each frame can be associated with the appropriate data.
Here is a function that can visualise the 2D points on the video:
def track_pose_2d(video_path: str) -> None:
mp_pose = mp.solutions.pose
with closing(VideoSource(video_path)) as video_source, mp_pose.Pose() as pose:
for idx, bgr_frame in enumerate(video_source.stream_bgr()):
if max_frame_count is not None and idx >= max_frame_count:
break
rgb = cv2.cvtColor(bgr_frame.data, cv2.COLOR_BGR2RGB)
# Associate frame with the data
rr.set_time_seconds("time", bgr_frame.time)
rr.set_time_sequence("frame_idx", bgr_frame.idx)
# Present the video
rr.log("video/rgb", rr.Image(rgb).compress(jpeg_quality=75))
# Get the prediction results
results = pose.process(rgb)
h, w, _ = rgb.shape
# Log 2d points to 'video' entity
landmark_positions_2d = read_landmark_positions_2d(results, w, h)
if landmark_positions_2d is not None:
rr.log(
"video/pose/points",
rr.Points2D(landmark_positions_2d, class_ids=0, keypoint_ids=mp_pose.PoseLandmark),
)
3D World Coordinates — 3D Points
Visualising Human Pose as 3D Points | Image by Author
Why settle on 2D points when you have 3D Points? Create a new entity, name it “Person”, and log the 3D points. It’s done! You just created a 3D presentation of the human body pose.
Here is how to do it:
def track_pose_3d(video_path: str, *, segment: bool, max_frame_count: int | None) -> None:
mp_pose = mp.solutions.pose
rr.log("person", rr.ViewCoordinates.RIGHT_HAND_Y_DOWN, timeless=True)
with closing(VideoSource(video_path)) as video_source, mp_pose.Pose() as pose:
for idx, bgr_frame in enumerate(video_source.stream_bgr()):
if max_frame_count is not None and idx >= max_frame_count:
break
rgb = cv2.cvtColor(bgr_frame.data, cv2.COLOR_BGR2RGB)
# Associate frame with the data
rr.set_time_seconds("time", bgr_frame.time)
rr.set_time_sequence("frame_idx", bgr_frame.idx)
# Present the video
rr.log("video/rgb", rr.Image(rgb).compress(jpeg_quality=75))
# Get the prediction results
results = pose.process(rgb)
h, w, _ = rgb.shape
# New entity "Person" for the 3D presentation
landmark_positions_3d = read_landmark_positions_3d(results)
if landmark_positions_3d is not None:
rr.log(
"person/pose/points",
rr.Points3D(landmark_positions_3d, class_ids=0, keypoint_ids=mp_pose.PoseLandmark),
)
Source Code Exploration
The tutorial focuses on the main parts of the Human Pose Tracking example. For those who prefer a hands-on approach, the full source code for this example is available on GitHub. Feel free to explore, modify, and understand the inner workings of the implementation.
Tips & Suggestions
1. Compress the image for efficiency
You can boost the overall procedure speed by compressing the logged images:
rr.log(
"video",
rr.Image(img).compress(jpeg_quality=75)
)
2. Limit Memory Use
If you’re logging more data than can be fitted into your RAM, it will start dropping the old data. The default limit is 75% of your system RAM. If you want to increase that you could use the command line argument — memory-limit. More information about memory limits can be found on Rerun’s How To Limit Memory Use page.
3. Customise Visualisations for your needs

Customise Rerun Viewer | Image by Author
Beyond Human Pose Tracking
If you found this article useful and insightful, there’s more!
Similar articles:
Real-Time Hand Tracking and Gesture Recognition with MediaPipe: Rerun Showcase
I regularly share tutorials on visualisation for computer vision and robotics. Follow me for future updates!
Also, you can find me on LinkedIn.
Sources
[1] Pose Landmark Detection Guide by Google, Portions of this page are reproduced from work created and shared by Google and used according to terms described in the Creative Commons 4.0 Attribution License.
[2] Rerun Docs by Rerun under MIT license

Human Pose Tracking with MediaPipe in 2D and 3D: Rerun Showcase was originally published in Towards Data Science on Medium, where people are continuing the conversation by highlighting and responding to this story.
Human Pose Tracking | Image by Author
Overview
We explore a use case that leverages the power of MediaPipe for tracking human poses in both 2D and 3D. What makes this exploration even more fascinating is the visualisation aspect powered by the open-source visualisation tool Rerun, which provides a holistic view of human poses in action.
In this blog post, you’ll be guided to use MediaPipe to track human poses in 2D and 3D, and explore the visualisation capabilities of Rerun.
Human Pose Tracking
Human pose tracking is a task in computer vision that focuses on identifying key body locations, analysing posture, and categorising movements. At the heart of this technology is a pre-trained machine-learning model to assess the visual input and recognise landmarks on the body in both image coordinates and 3D world coordinates. The use cases and applications of this technology include but are not limited to Human-Computer Interaction, Sports Analysis, Gaming, Virtual Reality, Augmented Reality, Health, etc.
It would be good to have a perfect model, but unfortunately, the current models are still imperfect. Although datasets could have a variety of body types, the human body differs among individuals. The uniqueness of each individual’s body poses a challenge, particularly for those with non-standard arm and leg dimensions, which may result in lower accuracy when using this technology. When considering the integration of this technology into systems, it is crucial to acknowledge the possibility of inaccuracies. Hopefully, ongoing efforts within the scientific community will pave the way for the development of more robust models.
Beyond lack of accuracy, ethical and legal considerations emerge from utilising this technology. For instance, capturing human body poses in public spaces could potentially invade privacy rights if individuals have not given their consent. It’s crucial to take into account any ethical and legal concerns before implementing this technology in real-world scenarios.
Prerequisites & Setup
Begin by installing the required libraries:
# Install the required Python packages
pip install mediapipe
pip install numpy
pip install opencv-python<4.6
pip install requests>=2.31,<3
pip install rerun-sdk
# or just use the requirements file
pip install -r examples/python/human_pose_tracking/requirements.txt
Track Human Pose using MediaPipe
Image via Pose Landmark Detection Guide by Google [1]
MediaPipe Python is a handy tool for developers looking to integrate on-device ML solutions for computer vision and machine learning.
In the code below, MediaPipe pose landmark detection was utilised for detecting landmarks of human bodies in an image. This model can detect body pose landmarks as both image coordinates and 3D world coordinates. Once you have successfully run the ML model, you can use the image coordinates and the 3D world coordinates to visualise the output.
import mediapipe as mp
import numpy as np
from typing import Any
import numpy.typing as npt
import cv2
"""
Read 2D landmark positions from Mediapipe Pose results.
Args:
results (Any): Mediapipe Pose results.
image_width (int): Width of the input image.
image_height (int): Height of the input image.
Returns:
np.array | None: Array of 2D landmark positions or None if no landmarks are detected.
"""
def read_landmark_positions_2d(
results: Any,
image_width: int,
image_height: int,
) -> npt.NDArray[np.float32] | None:
if results.pose_landmarks is None:
return None
else:
# Extract normalized landmark positions and scale them to image dimensions
normalized_landmarks = [results.pose_landmarks.landmark[lm] for lm in mp.solutions.pose.PoseLandmark]
return np.array([(image_width * lm.x, image_height * lm.y) for lm in normalized_landmarks])
"""
Read 3D landmark positions from Mediapipe Pose results.
Args:
results (Any): Mediapipe Pose results.
Returns:
np.array | None: Array of 3D landmark positions or None if no landmarks are detected.
"""
def read_landmark_positions_3d(
results: Any,
) -> npt.NDArray[np.float32] | None:
if results.pose_landmarks is None:
return None
else:
# Extract 3D landmark positions
landmarks = [results.pose_world_landmarks.landmark[lm] for lm in mp.solutions.pose.PoseLandmark]
return np.array([(lm.x, lm.y, lm.z) for lm in landmarks])
"""
Track and analyze pose from an input image.
Args:
image_path (str): Path to the input image.
"""
def track_pose(image_path: str) -> None:
# Read the image, convert color to RGB
image = cv2.imread(image_path)
image = cv2.cvtColor(image, cv2.COLOR_BGR2RGB)
# Create a Pose model instance
pose_detector = mp.solutions.pose.Pose(static_image_mode=True)
# Process the image to obtain pose landmarks
results = pose_detector.process(image)
h, w, _ = image.shape
# Read 2D and 3D landmark positions
landmark_positions_2d = read_landmark_positions_2d(results, w, h)
landmark_positions_3d = read_landmark_positions_3d(results)
Visualise the output of MediaPipe using Rerun
Rerun Viewer | Image via Rerun Docs [2]
Rerun serves as a visualisation tool for multi-modal data. Through the Rerun Viewer, you can build layouts, customise visualisations and interact with your data. The rest part of this section details how you can log and present data using the Rerun SDK to visualise it within the Rerun Viewer
Pose Landmarker Model | Image via Pose Landmark Detection Guide by Google [1]
In both 2D and 3D points, specifying connections between points is essential. Defining these connections automatically renders lines between them. Using the information provided by MediaPipe, you can get the pose points connections from the POSE_CONNECTIONS set and then set them as keypoint connections using Annotation Context.
rr.log(
"/",
rr.AnnotationContext(
rr.ClassDescription(
info=rr.AnnotationInfo(id=0, label="Person"),
keypoint_annotations=[rr.AnnotationInfo(id=lm.value, label=lm.name) for lm in mp_pose.PoseLandmark],
keypoint_connections=mp_pose.POSE_CONNECTIONS,
)
),
timeless=True,
)
Image Coordinates — 2D Positions
Visualising Human Pose as 2D Points | Image by Author
Visualising the body pose landmarks on the video appears to be a good choice. To achieve that, you need to follow the rerun documentation for Entities and Components. The Entity Path Hierarchy page describes how to log multiple Components on the same Entity. For example, you can create the ‘video’ entity and include the components ‘video/rgb’ for the video and ‘video/pose’ for the body pose. If you’re aiming to use that for a video, you need the concept of Timelines. Each frame can be associated with the appropriate data.
Here is a function that can visualise the 2D points on the video:
def track_pose_2d(video_path: str) -> None:
mp_pose = mp.solutions.pose
with closing(VideoSource(video_path)) as video_source, mp_pose.Pose() as pose:
for idx, bgr_frame in enumerate(video_source.stream_bgr()):
if max_frame_count is not None and idx >= max_frame_count:
break
rgb = cv2.cvtColor(bgr_frame.data, cv2.COLOR_BGR2RGB)
# Associate frame with the data
rr.set_time_seconds("time", bgr_frame.time)
rr.set_time_sequence("frame_idx", bgr_frame.idx)
# Present the video
rr.log("video/rgb", rr.Image(rgb).compress(jpeg_quality=75))
# Get the prediction results
results = pose.process(rgb)
h, w, _ = rgb.shape
# Log 2d points to 'video' entity
landmark_positions_2d = read_landmark_positions_2d(results, w, h)
if landmark_positions_2d is not None:
rr.log(
"video/pose/points",
rr.Points2D(landmark_positions_2d, class_ids=0, keypoint_ids=mp_pose.PoseLandmark),
)
3D World Coordinates — 3D Points
Visualising Human Pose as 3D Points | Image by Author
Why settle on 2D points when you have 3D Points? Create a new entity, name it “Person”, and log the 3D points. It’s done! You just created a 3D presentation of the human body pose.
Here is how to do it:
def track_pose_3d(video_path: str, *, segment: bool, max_frame_count: int | None) -> None:
mp_pose = mp.solutions.pose
rr.log("person", rr.ViewCoordinates.RIGHT_HAND_Y_DOWN, timeless=True)
with closing(VideoSource(video_path)) as video_source, mp_pose.Pose() as pose:
for idx, bgr_frame in enumerate(video_source.stream_bgr()):
if max_frame_count is not None and idx >= max_frame_count:
break
rgb = cv2.cvtColor(bgr_frame.data, cv2.COLOR_BGR2RGB)
# Associate frame with the data
rr.set_time_seconds("time", bgr_frame.time)
rr.set_time_sequence("frame_idx", bgr_frame.idx)
# Present the video
rr.log("video/rgb", rr.Image(rgb).compress(jpeg_quality=75))
# Get the prediction results
results = pose.process(rgb)
h, w, _ = rgb.shape
# New entity "Person" for the 3D presentation
landmark_positions_3d = read_landmark_positions_3d(results)
if landmark_positions_3d is not None:
rr.log(
"person/pose/points",
rr.Points3D(landmark_positions_3d, class_ids=0, keypoint_ids=mp_pose.PoseLandmark),
)
Source Code Exploration
The tutorial focuses on the main parts of the Human Pose Tracking example. For those who prefer a hands-on approach, the full source code for this example is available on GitHub. Feel free to explore, modify, and understand the inner workings of the implementation.
Tips & Suggestions
1. Compress the image for efficiency
You can boost the overall procedure speed by compressing the logged images:
rr.log(
"video",
rr.Image(img).compress(jpeg_quality=75)
)
2. Limit Memory Use
If you’re logging more data than can be fitted into your RAM, it will start dropping the old data. The default limit is 75% of your system RAM. If you want to increase that you could use the command line argument — memory-limit. More information about memory limits can be found on Rerun’s How To Limit Memory Use page.
3. Customise Visualisations for your needs
Customise Rerun Viewer | Image by Author
Beyond Human Pose Tracking
If you found this article useful and insightful, there’s more!
Similar articles:
Real-Time Hand Tracking and Gesture Recognition with MediaPipe: Rerun Showcase
I regularly share tutorials on visualisation for computer vision and robotics. Follow me for future updates!
Also, you can find me on LinkedIn.
Sources
[1] Pose Landmark Detection Guide by Google, Portions of this page are reproduced from work created and shared by Google and used according to terms described in the Creative Commons 4.0 Attribution License.
[2] Rerun Docs by Rerun under MIT license
Human Pose Tracking with MediaPipe in 2D and 3D: Rerun Showcase was originally published in Towards Data Science on Medium, where people are continuing the conversation by highlighting and responding to this story.