Such a long guide to the Windows recycle bin? Yes, because the Windows tool offers much more than just collecting data that is no longer needed. The term “collect” was chosen deliberately because it describes the function of the recycle bin much better than “delete.”
As with the real recycle bin at home, what you throw in it is not gone. Rather, the waste bin must be emptied so that it does not overflow and the discarded contents actually disappear.
Both also apply to Windows: The space in the recycle bin is limited and “deleted” files can be restored without much effort. It therefore does not offer protection for confidential content.
See also: Windows 10 tips and tricks that help you get stuff done faster and 10 Windows 11 tips and tricks we use to customize our PCs
The recycle bin does not delete the data it contains
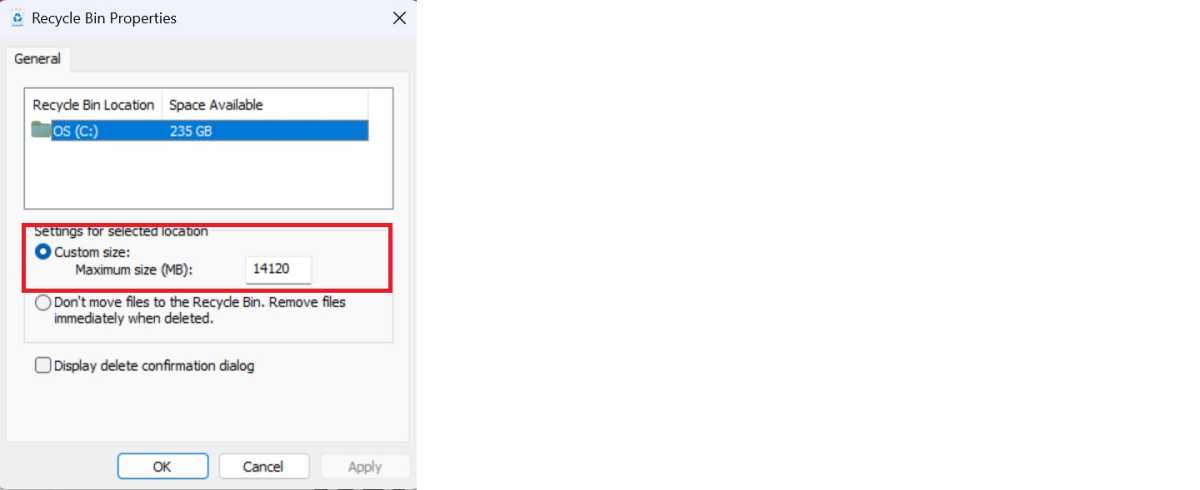
You can use the context menu of the recycle bin to define the maximum storage space it can occupy on the hard drive and set what happens to “deleted” items.
Foundry
This should also be emphasized again because Microsoft always refers to the Windows function as “Delete” — but it should correctly be called “Move to Recycle Bin.”
Even the option “Delete files immediately (do not move to recycle bin)” cannot hide this fact. This is because the data itself is not really gone or deleted. This recycle bin setting at least ensures that hard drive space is actually freed up for saving other data when “deleting.” At the same time, this overwriting makes it more difficult to reconstruct the deleted elements.
The additional option “Show dialogue to confirm deletion dialogue,” on the other hand, only skips the confirmation prompt, so the “deleted” data is still there, occupies storage space, and can be easily restored.
Tip: You can prevent this by using Secure Eraser to overwrite files and free storage space several times after emptying the recycle bin.
Windows allows different recycle bin settings for each partition and hard drive: While the operating system can delete the elements of one area directly, it can collect those of another in the recycle bin. You can bypass the “Collect” setting in individual cases if you use the Shift+Del shortcut instead of the Del key to delete. The maximum storage space used by the recycle bin can also be configured separately for each partition.
It is important to note that Microsoft proceeds differently when deleting external drives: While the delete command moves items from external USB hard drives to the recycle bin as with internal ones, they are bypassed by the recycle bin and deleted immediately in the case of USB sticks and network hard drives. At least Windows indicates this with the question “Do you want to permanently delete these items?”.
Further reading: How to securely erase your hard drive or SSD
Icons, icon size, explorer entry, taskbar, context menu
In Windows 10 and 11, you can change the desktop icon for the recycle bin or even have it hidden from view. Neither will have an effect on the deletion settings.
Foundry
You can show or hide the icon for the recycle bin on the desktop. To do this, open the Settings app and set whether the desktop icon should be visible under Personalization > Themes > Desktop icon settings. Hiding or showing it does not affect the recycle bin functions.
You can also change the icons for the empty and full recycle bin in the Settings. incidentally, “full” here does not mean full in the sense of the adjustable capacity limit, but in the sense of “something in there at all.”
To change the size of the recycle bin and all other desktop icons, hold down the Ctrl key and turn the scroll wheel of the mouse. You can change the icon size, including the labelling below it, in the Settings app under System > Screen (Windows 10) or System > Display (Windows 11). Select one of the default settings or “Custom scaling.”
If you want the recycle bin to appear on the left-hand side of the Windows Explorer tree structure, open the recycle bin and then right-click in a free space on the left-hand side of the tree structure. Click on the “Expand to current folder” option in the context menu — the recycle bin will then also appear there.
Do you want to pin the recycle bin to the taskbar? Because dragging it down with the mouse does not work, first create a shortcut by right-clicking on a free area of the desktop and selecting New > Shortcut in the context menu. Enter the following as the storage location:
C:\Windows\explorer.exe
shell:RecycleBinFolder
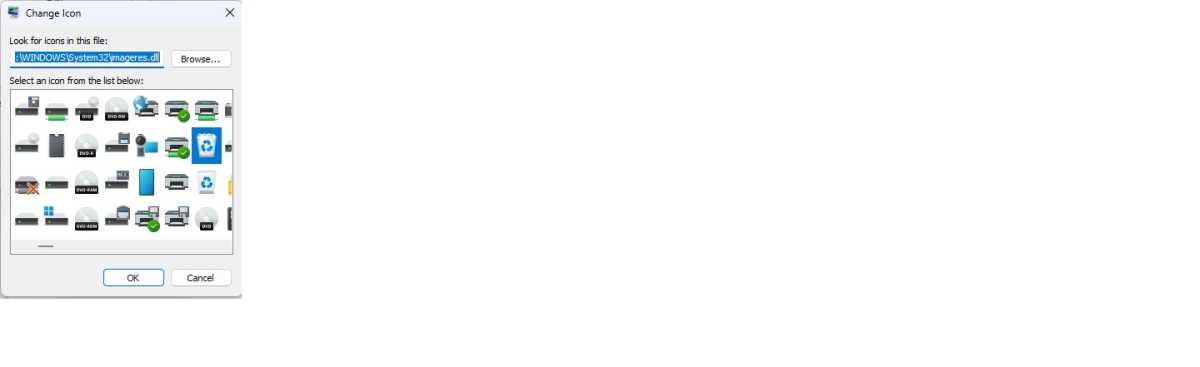
and select “Recycle bin” as the name. In the next step — and please do this before dragging the new shortcut down to the taskbar — change the icon from “Folder” to “Recycle Bin.”
To do this, right-click on the previously created desktop shortcut and continue with Properties > Other icon. You can find the correct recycle bin icon via Browse in the folder C:\Windows\System32\imageres.dll. Confirm with OK and then place the shortcut in the taskbar by dragging and dropping with the mouse button held down. If desired, you can even delete the desktop shortcut itself; the recycle bin in the taskbar will still work.
We should also mention how to get rid of annoying entries in the context menu of the recycle bin that may appear there after installing software. Open the Windows registry by typing regedit into the Run field in the taskbar. In the registry editor, press the shortcut Ctrl+F to display the search field. In it, type
645FF040-5081-101B-9F08-00AA002F954E
in it, press the Enter key and wait briefly until the hit is displayed. Double-click to open it and delete the entry for the program that does not belong in the recycle bin context menu in the “shell” subkey.
Automatically clear out the recycle bin
The fact that Windows does not actually delete data when “deleting,” but collects it in the recycle bin first, makes perfect sense — how easy it is to press the wrong key or click on the wrong command!
However, to keep an overview in the recycle bin, it makes sense to regularly delete the contents collected in it. Windows does this automatically.
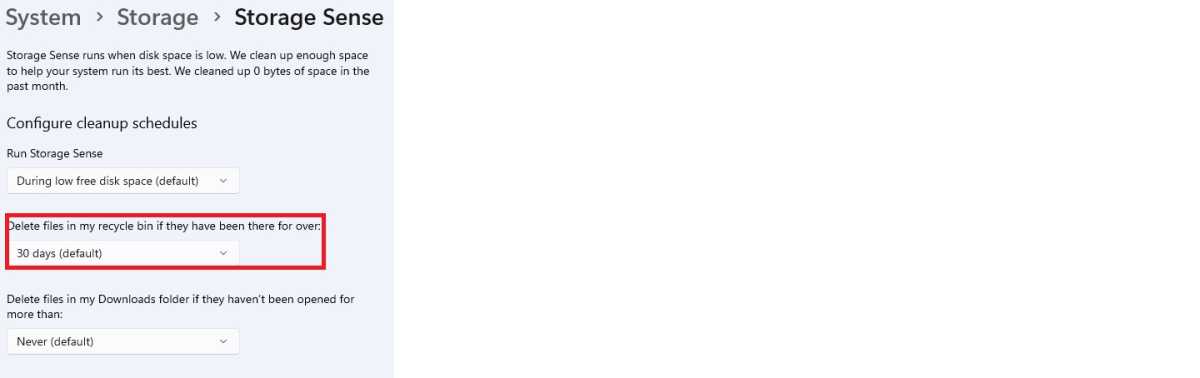
In the Windows Settings app, you can set the time after which the content stored in the recycle bin should disappear from view.
Foundry
This is how it works: Open the Settings app and click on System > Storage. In Windows 10, switch the slider to “On” and click on “Configure storage optimization;” in Windows 11, activate the “Storage Sense” option. In both systems, in addition to the general storage space optimization with the default setting “When storage space is low,” you will also find the option “Delete files from the recycle bin that are older than:”. The default setting is 30 days, which is quite a long time depending on PC usage. For a better overview in the recycle bin, reduce the deletion period to 14 days or even less.
Sorting: Orientation when finding and restoring
In Windows Explorer, the recycle bin behaves mainly like a normal directory: You can configure it just like any other folder and — to a limited extent — search through it.
Windows offers eight different views for folders and files, from “Contents” to “Extra large icons,” which you can select in the file manager via “View” (Windows 10) or “Show” (Windows 11). Which view you choose also depends on your personal habits and the amount of content.
The “Details” view also allows you to quickly sort the entire contents of the recycle bin by clicking on one of the column headers. For example, if you have deleted a file, you do not need its name to restore it. Clicking on the header of the “Date deleted” column — also possible as a default setting — places the file at the top. Although the sort function offers similar options in principle and even additional options under “More,” the result is often less clear and organized.
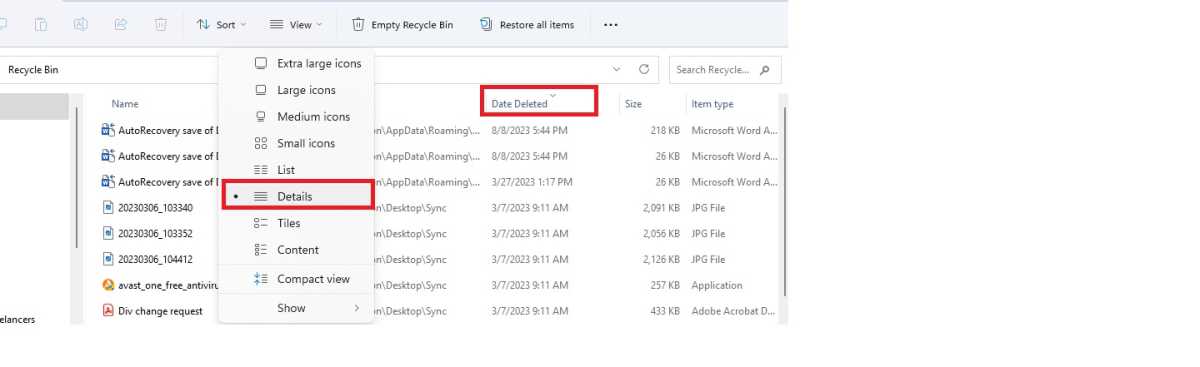
You can change the view of the recycle bin in Windows Explorer in the same way as any other folder. The “Details” make sorting easier with their column display.
Foundry
In addition to the sorting options, you can also search for content in Explorer. To do this, enter the name of the item you are looking for in the search field at the top right. Important: Windows offers the usual “search options” for the recycle bin, but the truncation characters such as the asterisk (*) work for any character. If you know part of the file name, this simplifies the search in the jumble of files.
Once you have found the element you are looking for in the recycle bin, use “Restore” in the context menu to return it to its original location. This also works if you select several elements. Instead of the original location, you can also restore the contents of the recycle bin to the desktop or any directory using drag and drop. Data that has already been “deleted” from the recycle bin can be restored with Recuva.
We expressly warn against using the “Restore all items” function — because it actually does what it promises. If you have pressed the button by mistake, you can undo the process immediately by pressing the key combination Ctrl+Z. This is much quicker and easier than trying to clear the restore mess manually with hundreds of elements.
Securely delete the recycle bin, HDD, and SSD
Files “deleted” via the Windows recycle bin are not really deleted, and can be restored relatively easily.
You can protect yourself against this by overwriting the data to be deleted several times with Secure Eraser. Alternatively, empty the recycle bin first and then use the tool to overwrite the empty storage space. However, Secure Eraser cannot completely delete the system partition or hard drive, as it runs under Windows. To completely erase the drive, boot the PC externally from a specially configured boot stick. Darik’s Boot and Nuke (DBAN) is suitable for magnetic hard drives. Use Rufus to create the boot stick with the erasure program from the DBAN ISO file.
Use the “Secure Erase” function to erase SSDs. This is integrated into the firmware of the drive and cannot be accessed while Windows is running. The easiest way to erase an SSD is if the manufacturer of the motherboard has integrated “Secure Erase” into the BIOS/UEFI.
However, this is by no means the case for all computers, so check the BIOS/UEFI. To do this, reboot the PC and press the button shown on the screen to open the BIOS/UEFI. As the interface differs from PC to PC, you may have to search a little.
If Secure Erase does not exist there, start your computer via a Linux live system from a boot stick: Either with a tool from the manufacturer of your SSD or with PartedMagic. The current version is now available for a fee; earlier free versions can be found on the internet with the suffix “free.” Use Rufus to create the boot stick from the ISO file to erase the SSD.
This article was translated from German to English and originally appeared on pcwelt.de.
Windows
As with the real recycle bin at home, what you throw in it is not gone. Rather, the waste bin must be emptied so that it does not overflow and the discarded contents actually disappear.
Both also apply to Windows: The space in the recycle bin is limited and “deleted” files can be restored without much effort. It therefore does not offer protection for confidential content.
See also: Windows 10 tips and tricks that help you get stuff done faster and 10 Windows 11 tips and tricks we use to customize our PCs
The recycle bin does not delete the data it contains
You can use the context menu of the recycle bin to define the maximum storage space it can occupy on the hard drive and set what happens to “deleted” items.
Foundry
This should also be emphasized again because Microsoft always refers to the Windows function as “Delete” — but it should correctly be called “Move to Recycle Bin.”
Even the option “Delete files immediately (do not move to recycle bin)” cannot hide this fact. This is because the data itself is not really gone or deleted. This recycle bin setting at least ensures that hard drive space is actually freed up for saving other data when “deleting.” At the same time, this overwriting makes it more difficult to reconstruct the deleted elements.
The additional option “Show dialogue to confirm deletion dialogue,” on the other hand, only skips the confirmation prompt, so the “deleted” data is still there, occupies storage space, and can be easily restored.
Tip: You can prevent this by using Secure Eraser to overwrite files and free storage space several times after emptying the recycle bin.
Windows allows different recycle bin settings for each partition and hard drive: While the operating system can delete the elements of one area directly, it can collect those of another in the recycle bin. You can bypass the “Collect” setting in individual cases if you use the Shift+Del shortcut instead of the Del key to delete. The maximum storage space used by the recycle bin can also be configured separately for each partition.
It is important to note that Microsoft proceeds differently when deleting external drives: While the delete command moves items from external USB hard drives to the recycle bin as with internal ones, they are bypassed by the recycle bin and deleted immediately in the case of USB sticks and network hard drives. At least Windows indicates this with the question “Do you want to permanently delete these items?”.
Further reading: How to securely erase your hard drive or SSD
Icons, icon size, explorer entry, taskbar, context menu
In Windows 10 and 11, you can change the desktop icon for the recycle bin or even have it hidden from view. Neither will have an effect on the deletion settings.
Foundry
You can show or hide the icon for the recycle bin on the desktop. To do this, open the Settings app and set whether the desktop icon should be visible under Personalization > Themes > Desktop icon settings. Hiding or showing it does not affect the recycle bin functions.
You can also change the icons for the empty and full recycle bin in the Settings. incidentally, “full” here does not mean full in the sense of the adjustable capacity limit, but in the sense of “something in there at all.”
To change the size of the recycle bin and all other desktop icons, hold down the Ctrl key and turn the scroll wheel of the mouse. You can change the icon size, including the labelling below it, in the Settings app under System > Screen (Windows 10) or System > Display (Windows 11). Select one of the default settings or “Custom scaling.”
If you want the recycle bin to appear on the left-hand side of the Windows Explorer tree structure, open the recycle bin and then right-click in a free space on the left-hand side of the tree structure. Click on the “Expand to current folder” option in the context menu — the recycle bin will then also appear there.
Do you want to pin the recycle bin to the taskbar? Because dragging it down with the mouse does not work, first create a shortcut by right-clicking on a free area of the desktop and selecting New > Shortcut in the context menu. Enter the following as the storage location:
C:\Windows\explorer.exe
shell:RecycleBinFolder
and select “Recycle bin” as the name. In the next step — and please do this before dragging the new shortcut down to the taskbar — change the icon from “Folder” to “Recycle Bin.”
To do this, right-click on the previously created desktop shortcut and continue with Properties > Other icon. You can find the correct recycle bin icon via Browse in the folder C:\Windows\System32\imageres.dll. Confirm with OK and then place the shortcut in the taskbar by dragging and dropping with the mouse button held down. If desired, you can even delete the desktop shortcut itself; the recycle bin in the taskbar will still work.
We should also mention how to get rid of annoying entries in the context menu of the recycle bin that may appear there after installing software. Open the Windows registry by typing regedit into the Run field in the taskbar. In the registry editor, press the shortcut Ctrl+F to display the search field. In it, type
645FF040-5081-101B-9F08-00AA002F954E
in it, press the Enter key and wait briefly until the hit is displayed. Double-click to open it and delete the entry for the program that does not belong in the recycle bin context menu in the “shell” subkey.
Automatically clear out the recycle bin
The fact that Windows does not actually delete data when “deleting,” but collects it in the recycle bin first, makes perfect sense — how easy it is to press the wrong key or click on the wrong command!
However, to keep an overview in the recycle bin, it makes sense to regularly delete the contents collected in it. Windows does this automatically.
In the Windows Settings app, you can set the time after which the content stored in the recycle bin should disappear from view.
Foundry
This is how it works: Open the Settings app and click on System > Storage. In Windows 10, switch the slider to “On” and click on “Configure storage optimization;” in Windows 11, activate the “Storage Sense” option. In both systems, in addition to the general storage space optimization with the default setting “When storage space is low,” you will also find the option “Delete files from the recycle bin that are older than:”. The default setting is 30 days, which is quite a long time depending on PC usage. For a better overview in the recycle bin, reduce the deletion period to 14 days or even less.
Sorting: Orientation when finding and restoring
In Windows Explorer, the recycle bin behaves mainly like a normal directory: You can configure it just like any other folder and — to a limited extent — search through it.
Windows offers eight different views for folders and files, from “Contents” to “Extra large icons,” which you can select in the file manager via “View” (Windows 10) or “Show” (Windows 11). Which view you choose also depends on your personal habits and the amount of content.
The “Details” view also allows you to quickly sort the entire contents of the recycle bin by clicking on one of the column headers. For example, if you have deleted a file, you do not need its name to restore it. Clicking on the header of the “Date deleted” column — also possible as a default setting — places the file at the top. Although the sort function offers similar options in principle and even additional options under “More,” the result is often less clear and organized.
You can change the view of the recycle bin in Windows Explorer in the same way as any other folder. The “Details” make sorting easier with their column display.
Foundry
In addition to the sorting options, you can also search for content in Explorer. To do this, enter the name of the item you are looking for in the search field at the top right. Important: Windows offers the usual “search options” for the recycle bin, but the truncation characters such as the asterisk (*) work for any character. If you know part of the file name, this simplifies the search in the jumble of files.
Once you have found the element you are looking for in the recycle bin, use “Restore” in the context menu to return it to its original location. This also works if you select several elements. Instead of the original location, you can also restore the contents of the recycle bin to the desktop or any directory using drag and drop. Data that has already been “deleted” from the recycle bin can be restored with Recuva.
We expressly warn against using the “Restore all items” function — because it actually does what it promises. If you have pressed the button by mistake, you can undo the process immediately by pressing the key combination Ctrl+Z. This is much quicker and easier than trying to clear the restore mess manually with hundreds of elements.
Securely delete the recycle bin, HDD, and SSD
Files “deleted” via the Windows recycle bin are not really deleted, and can be restored relatively easily.
You can protect yourself against this by overwriting the data to be deleted several times with Secure Eraser. Alternatively, empty the recycle bin first and then use the tool to overwrite the empty storage space. However, Secure Eraser cannot completely delete the system partition or hard drive, as it runs under Windows. To completely erase the drive, boot the PC externally from a specially configured boot stick. Darik’s Boot and Nuke (DBAN) is suitable for magnetic hard drives. Use Rufus to create the boot stick with the erasure program from the DBAN ISO file.
Use the “Secure Erase” function to erase SSDs. This is integrated into the firmware of the drive and cannot be accessed while Windows is running. The easiest way to erase an SSD is if the manufacturer of the motherboard has integrated “Secure Erase” into the BIOS/UEFI.
However, this is by no means the case for all computers, so check the BIOS/UEFI. To do this, reboot the PC and press the button shown on the screen to open the BIOS/UEFI. As the interface differs from PC to PC, you may have to search a little.
If Secure Erase does not exist there, start your computer via a Linux live system from a boot stick: Either with a tool from the manufacturer of your SSD or with PartedMagic. The current version is now available for a fee; earlier free versions can be found on the internet with the suffix “free.” Use Rufus to create the boot stick from the ISO file to erase the SSD.
This article was translated from German to English and originally appeared on pcwelt.de.
Windows