Program Name: Avid Media Composer 2018.4
Program Type: Vdeo Editing
Release Date: April 7, 2018
Homepage: www.avid.com/US/products/media-composer/
Interface Language: Multilingual
Platform: Win & Mac
Where are the Media Composer documents for the 2018 releases?
Media Composer v2018.4 What's New
Media Composer v2018.4 ReadMe
Media Composer v2018.4 Editing Guide
Editing Application Install Guide
New in Media Composer v2018.4
New Models of Media Composer
This release of Media Composer v2018.4 introduces new models of Media Composer. Media
Composer model options now include Media Composer | First, Media Composer,
Media Composer | Ultimate, and Media Composer Perpetual. For details on the features provided in the different Media Composer models see https://www.avid.com/media-composer/comparison.
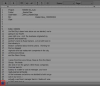
Media Composer Generates iXML Metadata When Creating WAV Media
WAV media generated using Audio Export, as well as managed media in OMF (Wave) format, will include iXML metadata that follows the iXML standard as published by Gallery UK and commonly used in audio field recorders. Included in the iXML are certain audio-relevant bin columns, such as scene and take information, markers, track names, and a SMPTE standard unique media identifier. This data can be used by downstream applications. Pro Tools, for example, will bring in the Scene, Take, and Track Name information.
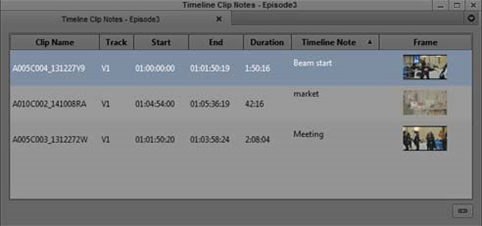
Timeline Clip Notes Window Representative Frame
You can display a representative frame in the Timeline Clip Notes window.
To display a representative frame in the Timeline Clip Notes window:
1. Select the sequence in the Timeline.
2. Select Tools > Timeline Clip Notes.
The Timeline clip notes for the selected sequence appear in the window.
3. Right-click in the Timeline Clip Notes window and select Choose Columns.
4. Select Frame.
5. Click OK.
A representative frame of the clip appears in the Timeline Clip Notes window.
Do one of the following to enlarge or reduce the image:
► Right-click and select Enlarge Frame or Reduce Frame.
► Type Ctrl+L or Ctrl+K.
► From the edit menu, choose Enlarge Frame or Reduce Frame.
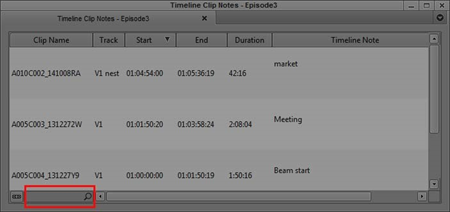
Searching for Text in the Timeline Clip Notes Window
The Timeline Quick Find field allows you to enter text that you can search for in the Timeline Clip Notes Windows.
To search for text in the Timeline Clip Notes Window:
1. With the sequence loaded in the Timeline, select Tools > Timeline Clip Notes to open the Timeline Clip Notes window.
2. Click the Quick Find field.
3. Enter the text you want to search for in the text field.
The window displays any clips that include the text entered in the find field in any column.
Customizing Timeline Views
With this release, you can have more control when customizing Timeline Views and you can then map the views to buttons on the user interface or keyboard.
To customize Timeline Views:
1. Make sure you have some Timeline Views created by clicking the View Menu button at the bottom of the Timeline, selecting Save As and typing a name for the view, and clicking OK. See “Managing Custom Timeline Views” in the Help for details. (These views will be available when mapping views to Timeline View buttons in the Command Palette.)
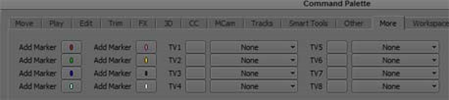
2. Select Tools > Command Palette.
3. Click the More tab.
4. From the Timeline View pulldown menu, select the view you want assigned to the Timeline View (TV) button.
5. Continue assigning different Timeline Views to the TV buttons.
6. Select Button to Button Reassignment.
7. Click a Timeline button and drag the button to another location (for example, the Timeline toolbar) or the Keyboard setting.
8. The Timeline button appears in the new location.
9. Click OK.
Setting Pre-Roll for Script Window and PhraseFind
When you playback a result from the Find Window or access a mark from the Script Window, you can set a pre-roll if you want to hear a few moments before the actual match to the word that has been phonetically indexed.
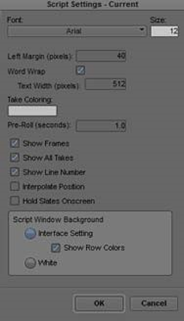
To set the Pre-Roll for the Script Window:
1. Click the Settings tab in the Project window.
2. Double-click Script.
The Script Settings Window opens.
3. Enter a value in the Pre-Roll (seconds) field.
4. Click OK.
The pre-roll is included when you access the script mark.
To set the Pre-Roll for PhraseFind:
1. Press Ctrl+F (Windows) or Cmd+F (Macintosh), or select Edit > Find.
The Find window opens.
2. Click the Settings icon (gear) at bottom left of the Find window.
The Search Settings Window opens.
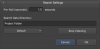
3. Enter a value in the Pre-Roll (seconds) field.
4. Click OK.
Perform a PhraseFind search (see “Using PhraseFind” in the Help.) Double click on the result. The position bar will move according to the Pre-Roll setting.
Setting Font and Font Size in the Timeline Clip Notes Window
You can change the font and adjust the font size for the Timeline Clip Notes window.
To change the font and font size of the Timeline Clip Notes window:
1. Select Tools > Timeline Clip Notes.
2. Do one of the following:
► Select Windows > Set Font.
► Right click in the Timeline Clip Notes window and select Set Font.
► Select Set Font from the Timeline Clip Notes window Fast menu.
3. Select the Font and enter the Font size you want to appear in the Timeline Clip Notes window.
4. Click OK.
The Timeline Clip Notes window displays the applicable font and font size.
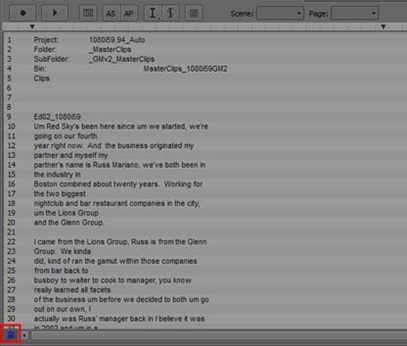
Refreshing Locked Scripts
Your Avid editing application uses a locking mechanism to help you keep track of who is currently working in a shared script. Only one user can edit the script, but multiple users can read the script This release includes two new script lock icon colors and status updates in the script titles to help you see the status of the Avid shared scripts.
This feature will only be enabled when the Project is stored on an Avid NEXIS or Avid ISIS workspace.
A new script lock icon color (yellow) has been added that indicates the owner of the shared script has made changes to the script. You will also notice that the script title provides a status in parentheses indicating that the locked script has been modified. If you click the yellow icon, the script refreshes and the new refreshed script displays the updated content and returns the icon red.
A new script lock icon color (blue) has been added that indicates that the owner of the shared script lock has released the lock and the script is now available for read/write. If you click the blue icon, you now control the script and the icon turns green. You can make changes in the script until you release the lock or close the script.
You can release the lock by Alt + clicking the green icon.
In addition, a Cancel option has been added to the dialog when you choose to close a locked script.
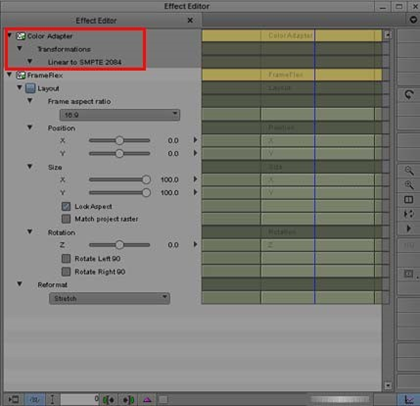
With this release, when editing in the Timeline, color adapters applied to clips are listed in the Effect Editor. This makes it easier to see which color adapter has been applied to clips. Previous releases simply displayed “Color Adapter” in the Effect Editor.
You can not edit the Color Adapters listed in the Effect Editor. You must make changes in the Source Settings and then refresh the Color Adapters in the Timeline.

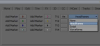
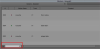
Updates to the Markers Window
The Markers Window updates include the following:
To move a column in the Marker Window:
1. With the Marker Window open, click the heading of the column that you want to move.
The column is highlighted.
2. Drag the column to the position you want, and release the mouse button.
A bounding outline of the column guides you as you drag it. The column appears in the new position, and columns to the right move to make room.
To hide a column:
1. Do one of the following to hide a column:
► Right-click a column heading and select Hide Column.
► Right-click a column heading, select Choose Columns, and deselect the column in the list.
The column disappears from the view, and surrounding columns close to fill the space.
To enlarge or reduce the size a the Marker Window column:
1. Click the border of a column’s heading, and drag it to the right or the left to resize it.
Setting Font and Font Size in the Markers Window
You can change the font and adjust the font size for the Markers window.
To change the font and font size of the Markers window:
1. Select Tools > Markers
2. Do one of the following:
► Select Windows > Set Font. t Right click in the Markers window and select Set Font.
► Select Set Font from the Markers window Fast menu.
3. Select the Font and enter the Font size you want to appear in the window.
4. Click OK.
The Markers window displays the applicable font and font size.
Using Quick Find in the Markers Window
You can search for text in the Markers window.
To search for text in the Markers window:
1. Select Tools > Markers
2. Click the Quick Find field.
3. Enter the text you want to search for in the text field.
The window displays any markers that include the text entered in the find field in any column.
The “Quick Find” command on the Command Palette will set focus to the Quick Find Field if the Marker Tool window is active.
Column configuration and chosen font are stored with the Marker Tool settings. These are stored in the project's setting.
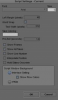
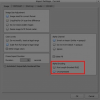
Run Length Encoding for Alpha on Import
This release allows you to choose to import an alpha channel as either Uncompressed or as Run Length Endcoded (RLE). RLE is used to reduce storage size and bandwidth during playback. (RLE) is a form of lossless data compression where runs of data are stored as a single data value and count.
The default is Uncompressed. Access the Project Window Import Settings to select RLE compression.
Important: If you import alpha with Run Length Encoded (RLE), you cannot bring that file back to a Media Composer version prior to Media Composer v2018.4.
Run Length Encoded (RLE) is not supported in SD projects.
Setting Pre-Roll for Script Window and PhraseFind
When you playback a result from the Find Window, you can set a pre-roll if you want to hear a few moments before the actual match to the word that has been phonetically indexed.
To set the Pre-Roll for PhraseFind:
1. Press Ctrl+F (Windows) or Cmd+F (Macintosh), or select Edit > Find.
The Find window opens.
2. Click the Settings icon (gear) at bottom left of the Find window.
The Search Settings Window opens.
3. Enter a value in the Pre-Roll (seconds) field.
4. Click OK.
Perform a PhraseFind search. Double click on the result. The position bar will move according to the Pre-Roll setting.
Performing an Insert Edit to an Exported Sequence
With this release, you can perform a file-based insert edit to an already exported sequence. This is helpful if you only want to replace a portion of a sequence without having to rerender the entire sequence. You can only perform the insert edit on a sequence that has been exported as an OP1a MXF using the Avid Media Processor Plug-in.
Note the following limitations:
1. Select your sequence and export it as OP1a MXF using the Avid Media Processor plug-in.

2. Click OK.
3. Load the sequence in the Timeline.
4. Make your changes.
5. Place a mark In/Out and/or spanned markers around the sections to be replaced.
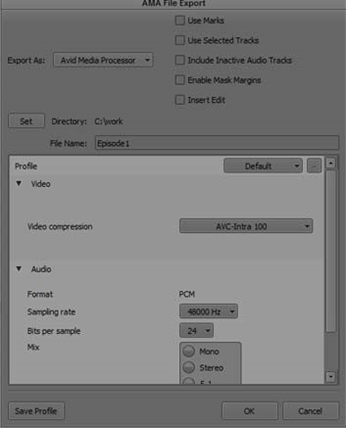
6. Select File > Output > AMA File Export.
7. Click Insert Edit.
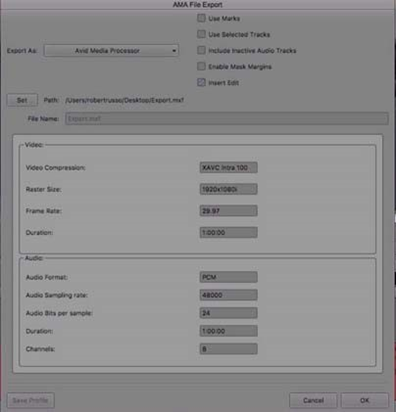
Once you select Insert Edit, the dialog will change to prompt you to set a path for the file to be selected for the insert.
Selecting the file will fill in the path and file details.
8. Select OK.
9. When prompted, select In and Out marks, or spanned markers.
The requested portion of the sequence will be replaced.
Windows Media Composer 2018.4 Download:
Mac Media Composer 2018.4 Download:
Program Type: Vdeo Editing
Release Date: April 7, 2018
Homepage: www.avid.com/US/products/media-composer/
Interface Language: Multilingual
Platform: Win & Mac
Where are the Media Composer documents for the 2018 releases?
Media Composer v2018.4 What's New
Media Composer v2018.4 ReadMe
Media Composer v2018.4 Editing Guide
Editing Application Install Guide
New in Media Composer v2018.4
New Models of Media Composer
This release of Media Composer v2018.4 introduces new models of Media Composer. Media
Composer model options now include Media Composer | First, Media Composer,
Media Composer | Ultimate, and Media Composer Perpetual. For details on the features provided in the different Media Composer models see https://www.avid.com/media-composer/comparison.
Media Composer Generates iXML Metadata When Creating WAV Media
WAV media generated using Audio Export, as well as managed media in OMF (Wave) format, will include iXML metadata that follows the iXML standard as published by Gallery UK and commonly used in audio field recorders. Included in the iXML are certain audio-relevant bin columns, such as scene and take information, markers, track names, and a SMPTE standard unique media identifier. This data can be used by downstream applications. Pro Tools, for example, will bring in the Scene, Take, and Track Name information.
Timeline Clip Notes Window Representative Frame
You can display a representative frame in the Timeline Clip Notes window.
To display a representative frame in the Timeline Clip Notes window:
1. Select the sequence in the Timeline.
2. Select Tools > Timeline Clip Notes.
The Timeline clip notes for the selected sequence appear in the window.
3. Right-click in the Timeline Clip Notes window and select Choose Columns.
4. Select Frame.
5. Click OK.
A representative frame of the clip appears in the Timeline Clip Notes window.
Do one of the following to enlarge or reduce the image:
► Right-click and select Enlarge Frame or Reduce Frame.
► Type Ctrl+L or Ctrl+K.
► From the edit menu, choose Enlarge Frame or Reduce Frame.
Searching for Text in the Timeline Clip Notes Window
The Timeline Quick Find field allows you to enter text that you can search for in the Timeline Clip Notes Windows.
To search for text in the Timeline Clip Notes Window:
1. With the sequence loaded in the Timeline, select Tools > Timeline Clip Notes to open the Timeline Clip Notes window.
2. Click the Quick Find field.
3. Enter the text you want to search for in the text field.
The window displays any clips that include the text entered in the find field in any column.
Customizing Timeline Views
With this release, you can have more control when customizing Timeline Views and you can then map the views to buttons on the user interface or keyboard.
To customize Timeline Views:
1. Make sure you have some Timeline Views created by clicking the View Menu button at the bottom of the Timeline, selecting Save As and typing a name for the view, and clicking OK. See “Managing Custom Timeline Views” in the Help for details. (These views will be available when mapping views to Timeline View buttons in the Command Palette.)
2. Select Tools > Command Palette.
3. Click the More tab.
4. From the Timeline View pulldown menu, select the view you want assigned to the Timeline View (TV) button.

5. Continue assigning different Timeline Views to the TV buttons.
6. Select Button to Button Reassignment.
7. Click a Timeline button and drag the button to another location (for example, the Timeline toolbar) or the Keyboard setting.
8. The Timeline button appears in the new location.
9. Click OK.
Setting Pre-Roll for Script Window and PhraseFind
When you playback a result from the Find Window or access a mark from the Script Window, you can set a pre-roll if you want to hear a few moments before the actual match to the word that has been phonetically indexed.
To set the Pre-Roll for the Script Window:
1. Click the Settings tab in the Project window.
2. Double-click Script.
The Script Settings Window opens.
3. Enter a value in the Pre-Roll (seconds) field.
4. Click OK.
The pre-roll is included when you access the script mark.
To set the Pre-Roll for PhraseFind:
1. Press Ctrl+F (Windows) or Cmd+F (Macintosh), or select Edit > Find.
The Find window opens.
2. Click the Settings icon (gear) at bottom left of the Find window.
The Search Settings Window opens.

3. Enter a value in the Pre-Roll (seconds) field.
4. Click OK.
Perform a PhraseFind search (see “Using PhraseFind” in the Help.) Double click on the result. The position bar will move according to the Pre-Roll setting.
Setting Font and Font Size in the Timeline Clip Notes Window
You can change the font and adjust the font size for the Timeline Clip Notes window.
To change the font and font size of the Timeline Clip Notes window:
1. Select Tools > Timeline Clip Notes.
2. Do one of the following:
► Select Windows > Set Font.
► Right click in the Timeline Clip Notes window and select Set Font.
► Select Set Font from the Timeline Clip Notes window Fast menu.
3. Select the Font and enter the Font size you want to appear in the Timeline Clip Notes window.
4. Click OK.
The Timeline Clip Notes window displays the applicable font and font size.
Refreshing Locked Scripts
Your Avid editing application uses a locking mechanism to help you keep track of who is currently working in a shared script. Only one user can edit the script, but multiple users can read the script This release includes two new script lock icon colors and status updates in the script titles to help you see the status of the Avid shared scripts.
This feature will only be enabled when the Project is stored on an Avid NEXIS or Avid ISIS workspace.
A new script lock icon color (yellow) has been added that indicates the owner of the shared script has made changes to the script. You will also notice that the script title provides a status in parentheses indicating that the locked script has been modified. If you click the yellow icon, the script refreshes and the new refreshed script displays the updated content and returns the icon red.
A new script lock icon color (blue) has been added that indicates that the owner of the shared script lock has released the lock and the script is now available for read/write. If you click the blue icon, you now control the script and the icon turns green. You can make changes in the script until you release the lock or close the script.
You can release the lock by Alt + clicking the green icon.
In addition, a Cancel option has been added to the dialog when you choose to close a locked script.
- Save Script As - choose if you want to save the script including any changes as a new script.
- Don’t Save - choose if you do not want to save any changes you might have made.
- Cancel - choose if you want to keep the locked script open and then decide where to save any script changes.
With this release, when editing in the Timeline, color adapters applied to clips are listed in the Effect Editor. This makes it easier to see which color adapter has been applied to clips. Previous releases simply displayed “Color Adapter” in the Effect Editor.
You can not edit the Color Adapters listed in the Effect Editor. You must make changes in the Source Settings and then refresh the Color Adapters in the Timeline.
Updates to the Markers Window
The Markers Window updates include the following:
- Rearrange, hide, resize columns.
- Setting Font and Font Size
- Quick Find
To move a column in the Marker Window:
1. With the Marker Window open, click the heading of the column that you want to move.
The column is highlighted.
2. Drag the column to the position you want, and release the mouse button.
A bounding outline of the column guides you as you drag it. The column appears in the new position, and columns to the right move to make room.
To hide a column:
1. Do one of the following to hide a column:
► Right-click a column heading and select Hide Column.
► Right-click a column heading, select Choose Columns, and deselect the column in the list.
The column disappears from the view, and surrounding columns close to fill the space.
To enlarge or reduce the size a the Marker Window column:
1. Click the border of a column’s heading, and drag it to the right or the left to resize it.
Setting Font and Font Size in the Markers Window
You can change the font and adjust the font size for the Markers window.
To change the font and font size of the Markers window:
1. Select Tools > Markers
2. Do one of the following:
► Select Windows > Set Font. t Right click in the Markers window and select Set Font.
► Select Set Font from the Markers window Fast menu.
3. Select the Font and enter the Font size you want to appear in the window.
4. Click OK.
The Markers window displays the applicable font and font size.
Using Quick Find in the Markers Window
You can search for text in the Markers window.
To search for text in the Markers window:
1. Select Tools > Markers
2. Click the Quick Find field.

3. Enter the text you want to search for in the text field.
The window displays any markers that include the text entered in the find field in any column.
The “Quick Find” command on the Command Palette will set focus to the Quick Find Field if the Marker Tool window is active.
Column configuration and chosen font are stored with the Marker Tool settings. These are stored in the project's setting.
Run Length Encoding for Alpha on Import
This release allows you to choose to import an alpha channel as either Uncompressed or as Run Length Endcoded (RLE). RLE is used to reduce storage size and bandwidth during playback. (RLE) is a form of lossless data compression where runs of data are stored as a single data value and count.
The default is Uncompressed. Access the Project Window Import Settings to select RLE compression.
Important: If you import alpha with Run Length Encoded (RLE), you cannot bring that file back to a Media Composer version prior to Media Composer v2018.4.
Run Length Encoded (RLE) is not supported in SD projects.

Setting Pre-Roll for Script Window and PhraseFind
When you playback a result from the Find Window, you can set a pre-roll if you want to hear a few moments before the actual match to the word that has been phonetically indexed.
To set the Pre-Roll for PhraseFind:
1. Press Ctrl+F (Windows) or Cmd+F (Macintosh), or select Edit > Find.
The Find window opens.
2. Click the Settings icon (gear) at bottom left of the Find window.
The Search Settings Window opens.
3. Enter a value in the Pre-Roll (seconds) field.
4. Click OK.
Perform a PhraseFind search. Double click on the result. The position bar will move according to the Pre-Roll setting.
Performing an Insert Edit to an Exported Sequence
With this release, you can perform a file-based insert edit to an already exported sequence. This is helpful if you only want to replace a portion of a sequence without having to rerender the entire sequence. You can only perform the insert edit on a sequence that has been exported as an OP1a MXF using the Avid Media Processor Plug-in.
Note the following limitations:
- File based Insert Edit is supported in 1080i/59.94 and 3840x2160p/59.94 project types
- The Sequence must have 8 Mono Tracks of Audio. Stereo is not supported.
- 3840x2160p/59.94 project types are supported with XAVC-I • 1080i/59.94 projects are supported with AVC-I and XAVC-I
1. Select your sequence and export it as OP1a MXF using the Avid Media Processor plug-in.
2. Click OK.
3. Load the sequence in the Timeline.
4. Make your changes.
5. Place a mark In/Out and/or spanned markers around the sections to be replaced.
6. Select File > Output > AMA File Export.
7. Click Insert Edit.
Once you select Insert Edit, the dialog will change to prompt you to set a path for the file to be selected for the insert.
Selecting the file will fill in the path and file details.
8. Select OK.
9. When prompted, select In and Out marks, or spanned markers.
The requested portion of the sequence will be replaced.
Windows Media Composer 2018.4 Download:
Для просмотра содержимого вам необходимо авторизоваться.
Mac Media Composer 2018.4 Download:
Для просмотра содержимого вам необходимо авторизоваться.