- Регистрация
- 15 Февраль 2018
- Сообщения
- 662
- Лучшие ответы
- 0
- Реакции
- 2
- Баллы
- 850
Offline
Media Composer can be affected by system settings and other software and hardware drivers installed on your computer.
To optimize the software on your client we suggest the following on Windows 10.
The first thing you should do is run the (ASDT) Avid System Diagnostic Tool's "BaseAnalyzer". You can download the ASDT below.
Avid System Diagnostic Tools are updated regularly and Avid recommends that the latest version is used wherever possible. The latest version is available from the following link:
Avid System Diagnostic Tools
Avid Collect Suite for Windows
Some users may experience difficulty opening this FTP link in a Web Browser. The following connection details can be used with a standard FTP client to download the latest ASDT installer file:
FTP site: ftp://interplay.avid.com
User: guest
Password: [none required]
If you have installed a previous ASDT version use the builtin update function to update and get the latest available version.
Once you have installed the ASDT.
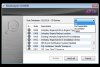
Find the BaseAnalyzer magnify glass icon. This will run a verify process and help optimize the client.

Click Verify All.

Once the BaseAnalyzer is complete, select the failed items and click details on them as you go down the list.
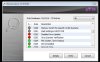
If you see a fix button when clicking on the failed items, press this "fix" button to resolve the issue. Sometimes to fix an issue, you must perform a manual operation, you can find these steps in the details button on each failed item.
Taken from from the ProTools Windows 10 Optimizations page:
For best performance, it is recommended that you take the following steps:
Optimizations
Update Graphics Driver
In many cases, outdated graphics drivers will not effectively utilize the Graphics Processing Unit (GPU), and will instead tax the computer's processor, stealing valuable resources from Pro Tools and causing a noticeable decrease in performance. Therefore, for optimal performance it is required that graphics drivers are kept up to date.
Update Network Adapter Driver
The quality of network adapter drivers may severely affect system performance. Outdated or poor quality drivers may cause Ethernet controllers to consume vital processing resources unnecessarily, limiting plug-in and track count and generating AAE errors during playback and record passes. It is therefore recommended to keep these drivers up to date at all times.
Disable Turbo Boost and C-State Transition (BIOS)
These settings are not available on all computers, but it is very important to disable them if possible. Turbo Boost and C-State Transition affect the way the clock speed of the processor is managed. When either of these are enabled, the processor will dynamically change speeds depending on computing activity. This throttling may cause errors in Pro Tools. You will need to access your computer's BIOS setup to change these settings.
Adjust Power Options
This optimization prevents the computer from going into Sleep Mode, which can cause playback issues with audio interfaces. This will also prevent the hard drives from going to sleep, and disables USB Selective Suspend, which can cause pops and clicks during record and playback with USB interfaces when enabled.
Supplemental: Disable USB Power Management (USB interfaces only)
This optimization frees up bandwidth on the USB bus and can help resolve problems with device recognition and driver installation.
Run as Administrator
This can help with various launch issues as well as a variety of MIDI issues (i.e., no MIDI output or control surface communication) and using the Avid/Digidesign hardware driver in third-party DAWs.
Hard Disk Optimizations
This optimization allows your hard drives to work more efficiently when recording and playing back audio files, and can sometimes resolve DAE Error -9073.
Install Latest Device Drivers
To ensure maximum compatibility with Pro Tools, it is important to install the latest drivers available for your audio interface.
Adjust Processor Scheduling
This optimization allows the computer to run Pro Tools more efficiently.
Troubleshooting
Not Hearing Input or Output
If you are unable to get input into or hear output from Pro Tools, the following troubleshooting steps may fix the problem.
Default I/O Setup:
Disable Unused Network Adapters
If you have updated your network adapter’s drivers and are still encountering AAE errors during playback or record, you can try disabling network adapters completely. In addition to freeing up system resources, disabling network adapters can sometimes alleviate some AAE Errors.
In addition to freeing up system resources, this can resolve conflicts with other applications that automatically start up when you boot your computer.
Enable Legacy FireWire Controller Driver (FireWire interfaces only)
This will change the FireWire controller on your system to the legacy controller previously used on Windows XP and Vista. In some cases, the legacy controller improves FireWire performance on Windows 10 and can resolve many Pro Tools issues such as AAE errors, freezes, and pops and clicks.
Turn off User Account Control
Turning off UAC can help with the “Session must be on an audio record volume” error and various other issues when launching Pro Tools.
Disable Microsoft ACPI-Compliant Control Method Battery (Laptops only)
This will disable the battery management functionality in Windows. This can help alleviate playback and record errors and improve performance, even when the laptop is powered from an outlet. Please note that this will generally disable the battery alerts and charge meter in Windows, so it is a good idea to turn re-enable this when not using Pro Tools.
Having up-to-date iLok drivers installed can help with any iLok/PACE related errors while launching or installing Pro Tools. It is also a good idea to update drivers if you're having authorization problems with any iLok-authorized plug-ins.
Create a New User Account
This can be useful if there are conflicting or corrupt user preferences causing problems in Pro Tools. In many cases, it is extremely difficult to pinpoint what exactly is causing the problem due to the number of applications installed on the system. In these cases, creating a new user account will be free of these conflicting preferences and allow Pro Tools to run without conflicts.
Enable DEP
This troubleshoot can sometimes help resolve issues with installing and launching Pro Tools software. If you have disabled this for any reason, it is often recommended to re-enable it.
Other Configurations
To optimize the software on your client we suggest the following on Windows 10.
The first thing you should do is run the (ASDT) Avid System Diagnostic Tool's "BaseAnalyzer". You can download the ASDT below.
Avid System Diagnostic Tools are updated regularly and Avid recommends that the latest version is used wherever possible. The latest version is available from the following link:
Avid System Diagnostic Tools
Avid Collect Suite for Windows
Some users may experience difficulty opening this FTP link in a Web Browser. The following connection details can be used with a standard FTP client to download the latest ASDT installer file:
FTP site: ftp://interplay.avid.com
User: guest
Password: [none required]
If you have installed a previous ASDT version use the builtin update function to update and get the latest available version.
Once you have installed the ASDT.
Find the BaseAnalyzer magnify glass icon. This will run a verify process and help optimize the client.
Click Verify All.
Once the BaseAnalyzer is complete, select the failed items and click details on them as you go down the list.
If you see a fix button when clicking on the failed items, press this "fix" button to resolve the issue. Sometimes to fix an issue, you must perform a manual operation, you can find these steps in the details button on each failed item.
Taken from from the ProTools Windows 10 Optimizations page:
For best performance, it is recommended that you take the following steps:
Optimizations
Update Graphics Driver
In many cases, outdated graphics drivers will not effectively utilize the Graphics Processing Unit (GPU), and will instead tax the computer's processor, stealing valuable resources from Pro Tools and causing a noticeable decrease in performance. Therefore, for optimal performance it is required that graphics drivers are kept up to date.
- Nearly all computers use a graphics controller (or graphics card) from Nvidia, AMD/ATI, or Intel. To find the make and model of your graphics controller, do the following:
- Click on the Windows Start button to bring up the Start Menu.
- Type Device Manager and press enter.
- Click the triangle next to Display Adapters.
- Your graphics card model will appear directly below.
- Double-click this item to view its properties.
- In the General tab, make a note of the model (shown at the top of the window), and the manufacturer.
- Select the Driver tab.
- Make a note of the driver version and date.
- To find the latest driver for your Graphics Controller, go to the appropriate manufacturer's web site:
- Locate the appropriate driver for your graphics controller. If your current driver is earlier than the latest version offered on the manufacturer's website, download and install the latest version.
Update Network Adapter Driver
The quality of network adapter drivers may severely affect system performance. Outdated or poor quality drivers may cause Ethernet controllers to consume vital processing resources unnecessarily, limiting plug-in and track count and generating AAE errors during playback and record passes. It is therefore recommended to keep these drivers up to date at all times.
- Click on the Windows Start button to bring up the Start Menu.
- Type Device Manager and press enter.
- Click the triangle next to Network Adapters.
- Network adapters come from a variety of manufacturers. In many cases they are built into the computer's motherboard, but sometimes are installed as optional PCI or PCIe cards in the computer's chassis.
- Locate and install the most current drivers for your network adapters by going to the adapter manufacturer's web site.
- There will often be more than one network adapter listed in the device manager. Try and update all network adapter drivers to the latest versions.
Disable Turbo Boost and C-State Transition (BIOS)
These settings are not available on all computers, but it is very important to disable them if possible. Turbo Boost and C-State Transition affect the way the clock speed of the processor is managed. When either of these are enabled, the processor will dynamically change speeds depending on computing activity. This throttling may cause errors in Pro Tools. You will need to access your computer's BIOS setup to change these settings.
- Consult your computer or motherboard manufacturer to determine if either of these settings are available on your system, and learn how to disable them if so.
Adjust Power Options
This optimization prevents the computer from going into Sleep Mode, which can cause playback issues with audio interfaces. This will also prevent the hard drives from going to sleep, and disables USB Selective Suspend, which can cause pops and clicks during record and playback with USB interfaces when enabled.
- Open the Start menu, type Control Panel, and press Enter.
- In Large icons View, click on Power Options.
- Select the High Performance power plan. Click on the Change plan settings link.
- Set the display's sleep time to Never.
- Set the computer's sleep time to Never.
- Click on the Change advanced power settings link.
- Click on the + sign next to Hard Disk.
- Click on the + sign next to Turn Off Hard Disk After.
- Click in the value box; the text entry field will now be accessible.
- In the text entry field, type Never.
- Click on the + sign next to USB settings.
- Click on the + sign next to USB selective suspend setting.
- Double-click where it says Enabled and click on Disabled.
- Click on the + sign next to Processor power management.
- Click on the + sign next to Minimum processor state.
- Type 100 in the Setting (%) text entry field.
- Click Apply then OK.
- Click Save Changes.
- Close the Power Options window.
Supplemental: Disable USB Power Management (USB interfaces only)
This optimization frees up bandwidth on the USB bus and can help resolve problems with device recognition and driver installation.
- Click on the Windows Start button to bring up the Start Menu.
- Type Device Manager and press enter.
- In the Device Manager window, double-click on Universal Serial Bus Controllers.
- Double-click on the first USB Root Hub item.
- Click on the Power Management tab.
- Uncheck the box that says Allow the computer to turn off this device to save power and click OK.
- Repeat this process for all other USB Root Hub items.
Run as Administrator
This can help with various launch issues as well as a variety of MIDI issues (i.e., no MIDI output or control surface communication) and using the Avid/Digidesign hardware driver in third-party DAWs.
- Right-click on the Pro Tools icon on your desktop.
- If using a third-party DAW, right-click on that application's icon instead.
- Choose Properties.
- Click on the Compatibility tab.
- Check the box that says Run this program as an administrator.
- Click Apply and then OK.
Hard Disk Optimizations
This optimization allows your hard drives to work more efficiently when recording and playing back audio files, and can sometimes resolve DAE Error -9073.
- Open the Start menu and click on File Explorer.
- Click This PC in the left column.
- Right-click on the first drive you intend to use for audio storage.
- Choose Properties.
- If checked, uncheck Compress this drive to save disk space.
- If checked, uncheck Allow files on this drive to have contents indexed.
- Click Apply and then OK.
- Repeat the process for each of your audio drives.
Install Latest Device Drivers
To ensure maximum compatibility with Pro Tools, it is important to install the latest drivers available for your audio interface.
- If you have an Avid/Digidesign interface, visit this page to download the latest drivers compatible with Pro Tools.
- For third-party interfaces, visit the manufacturer's website to download the latest drivers available for your audio interface.
Adjust Processor Scheduling
This optimization allows the computer to run Pro Tools more efficiently.
- Click on the Start Menu, type System, and press Enter.
- Choose Advanced System Settings.
- Under the Performance section, click the Settings button.
- In the Performance Options window, click the Advanced tab.
- Under the Processor Scheduling section, select the Background Services option.
- Hit Apply and then OK to close the Performance Options window.
- Click OK to close the System Properties window.
- Restart the computer for the changes to take effect.
Troubleshooting
Not Hearing Input or Output
If you are unable to get input into or hear output from Pro Tools, the following troubleshooting steps may fix the problem.
Default I/O Setup:
- Open a Pro Tools session.
- Click on the Setup menu.
- Click on I/O.
- By default, you'll be on the Output tab. Click on the Default button towards the bottom left corner.
- Click on the Input tab and then the Default button again.
- Click on the Bus tab and then the Default button once again.
- Click OK to save these changes.
- The input and output paths for your audio interface should now be set to the default settings for your audio interface.
- Double-check your input and output settings in the Mix window of Pro Tools to make sure they're now set correctly, and test again.
- Launch Pro Tools.
- From the Quick Start menu, choose Create Blank Session.
- For I/O Settings choose the Stereo Mix option.
- Click OK.
- The session will now be created with the default input/output settings for your audio interface. Do a test recording or import some audio and see if your issue persists.
Disable Unused Network Adapters
If you have updated your network adapter’s drivers and are still encountering AAE errors during playback or record, you can try disabling network adapters completely. In addition to freeing up system resources, disabling network adapters can sometimes alleviate some AAE Errors.
- Open the Start menu, type Device Manager, and press Enter.
- In the Device Manager window, double-click Network adapters.
- Right-click the network adapter you wish to deactivate, and choose Disable.
- Close the Device Manager window.
In addition to freeing up system resources, this can resolve conflicts with other applications that automatically start up when you boot your computer.
- Click the Windows Start Button.
- Type msconfig and press Enter.
- The System Configuration Utility opens. Under the General tab, choose Selective Startup.
- Deselect Load Startup Items.
- Go to the Services tab and check the option to Hide All Microsoft Services.
- Click Disable All.
- Click on the column labeled Manufacturer to sort items by manufacturer.
- Locate all items with Avid, Digidesign, or PACE listed as the manufacturer.
- Check them and click Apply.
- Close the System Configuration Utility.
- Restart the computer.
- You can revert to the original settings by running msconfig and choosing Normal Startup.
Enable Legacy FireWire Controller Driver (FireWire interfaces only)
This will change the FireWire controller on your system to the legacy controller previously used on Windows XP and Vista. In some cases, the legacy controller improves FireWire performance on Windows 10 and can resolve many Pro Tools issues such as AAE errors, freezes, and pops and clicks.
- Click the Windows Start Button, type Device Manager, and press Enter.
- In the Device Manager window, double-click on IEEE 1394 Bus host controllers.
- Double-click on the controller (or port) that your FireWire interface is connected to.
- Click on the Driver tab.
- Click on Update Driver.
- Choose Browse my computer for driver software.
- Choose Let me pick from a list of device drivers on my computer.
- Choose 1394 OHCI Compliant Host Controller (Legacy).
- Restart the computer.
Turn off User Account Control
Turning off UAC can help with the “Session must be on an audio record volume” error and various other issues when launching Pro Tools.
- Click the Windows Start Button, type Control Panel, and press Enter.
- In Large icon View, click User Accounts.
- Click on Change User Account Control Settings.
- Set it to Never notify.
- Click OK.
- Restart the computer.
Disable Microsoft ACPI-Compliant Control Method Battery (Laptops only)
This will disable the battery management functionality in Windows. This can help alleviate playback and record errors and improve performance, even when the laptop is powered from an outlet. Please note that this will generally disable the battery alerts and charge meter in Windows, so it is a good idea to turn re-enable this when not using Pro Tools.
- Click the Windows Start Button, type Device Manager, and press Enter.
- In the Device Manager window, and double-click on Batteries.
- Right-Click on Microsoft ACPI-Compliant Control Method Battery, and choose Disable.
- Close the Device Manager window.
Having up-to-date iLok drivers installed can help with any iLok/PACE related errors while launching or installing Pro Tools. It is also a good idea to update drivers if you're having authorization problems with any iLok-authorized plug-ins.
- Download and install the latest License Support installer from iLok.com.
Create a New User Account
This can be useful if there are conflicting or corrupt user preferences causing problems in Pro Tools. In many cases, it is extremely difficult to pinpoint what exactly is causing the problem due to the number of applications installed on the system. In these cases, creating a new user account will be free of these conflicting preferences and allow Pro Tools to run without conflicts.
- Click the Windows Start Button, type Control Panel, and press Enter.
- In Large Icons view, click on User Accounts, then click Manage another account.
- Click on Add a new user in PC settings.
- Click Add someone else to this PC under Other Users.
- Click I don't have this person's sign-in information.
- Click Add a user without a Microsoft account.
- Enter a name and password for the account and click Next.
- Click on the new account name, and click Change account type.
- Change the account type to Administrator and click OK.
- Press ctrl+alt+delete.
- Choose Log off.
- Choose the new account that you just created.
- Launch Pro Tools from the Start menu.
Enable DEP
This troubleshoot can sometimes help resolve issues with installing and launching Pro Tools software. If you have disabled this for any reason, it is often recommended to re-enable it.
- Open the Start menu and type cmd but do not press Enter. Command Prompt should be visible under Best Match.
- Right-click on Command Prompt and choose Run as administrator.
- Click the
 button if it asks you for permission.
 - Type or copy and paste this into the Command Prompt window: bcdedit.exe /set {current} nx OptIn
- Hit Enter and you should see the confirmation: Operation Completed Successfully.
- Restart the computer and DEP should be on for the entire system.
Other Configurations
- Avoid connecting Avid interfaces to USB/FireWire hubs in most cases.
- Remove CDs or DVDs from any optical drives before launching Pro Tools.
- Avoid running any unneeded programs at the same time as Pro Tools.
- Turn off any software utilities that run in the background, such as Windows Messenger, calendars, and disk maintenance programs. See Disabling System Startup Items above.
- Turn off any non-essential USB devices while running Pro Tools.
- If your video display card supports it, enable Bus Mastering in the manufacturer’s Control Panel.
Вложения
-
 13.6 KB Просмотры: 0
 -
 35.3 KB Просмотры: 0
Последнее редактирование: